Feature Guide · Version 1.1 · Public beta
V-Asist
Video assist for the film set, on a Mac. Recording that follows the camera's own REC, two live SDI inputs, monitor tools, synced playback of two cameras, an edit room, a processed SDI feed and a live stream to iPhone and iPad.
At a glance
- Auto-REC from the camera's own SDI REC flag, frame-accurate.
- Two inputs live, Dual or Full, Live or Disk per view.
- Ten monitor tools per view, sent out the SDI exactly as seen.
- Transform the picture: scale, stretch, rotate, move.
- Mix: a storyboard frame, logo, GIF or video over the picture.
- Speed, Clip Sync, Play Sync: two cameras' takes played together.
- Multiple IN / OUT pairs per take; play All or One; jump with [ ].
- Rate by keyboard: ⌥A then a number.
- Status panel with a full log of every warning and take.
- Projects: rename, duplicate, export, import, delete to Trash.
- Stream both views to iPhone and iPad.
- Export: shot log (CSV, PDF), EDL and Final Cut XML.
Contents
- Getting started
- The screen, button by button
- Auto-REC
- Recording formats
- Audio
- Transport, IN / OUT and playback
- Speed, Clip Sync and Play Sync
- Monitor tools
- Transform and Mix
- The clip list and rating
- Status panel and log
- SDI output
- Network stream and V-Asist Monitor
- Edit room
- Projects and export
- Appearance
- Safety on set
- Keyboard shortcuts
- Hardware and requirements
01
Getting started
- Install the driver for your capture hardware: AJA desktop software (NTV2) or Blackmagic Desktop Video.
- Open V-Asist, go to Project ▸ Camera, pick AJA, Blackmagic or System, choose one or two inputs and a device for each. Name them (CAM_A, CAM_B…).
- Set where takes go in Project ▸ Projects ▸ Recording Destination, and the codec in Output Format.
- Switch on Auto-REC in Project ▸ Automation so takes start and stop with the camera.
- Go to Live Shoot (⇧2) and roll.
V-Asist reopens exactly where you left it: the project, the views, every tool setting.
02
The screen, button by button
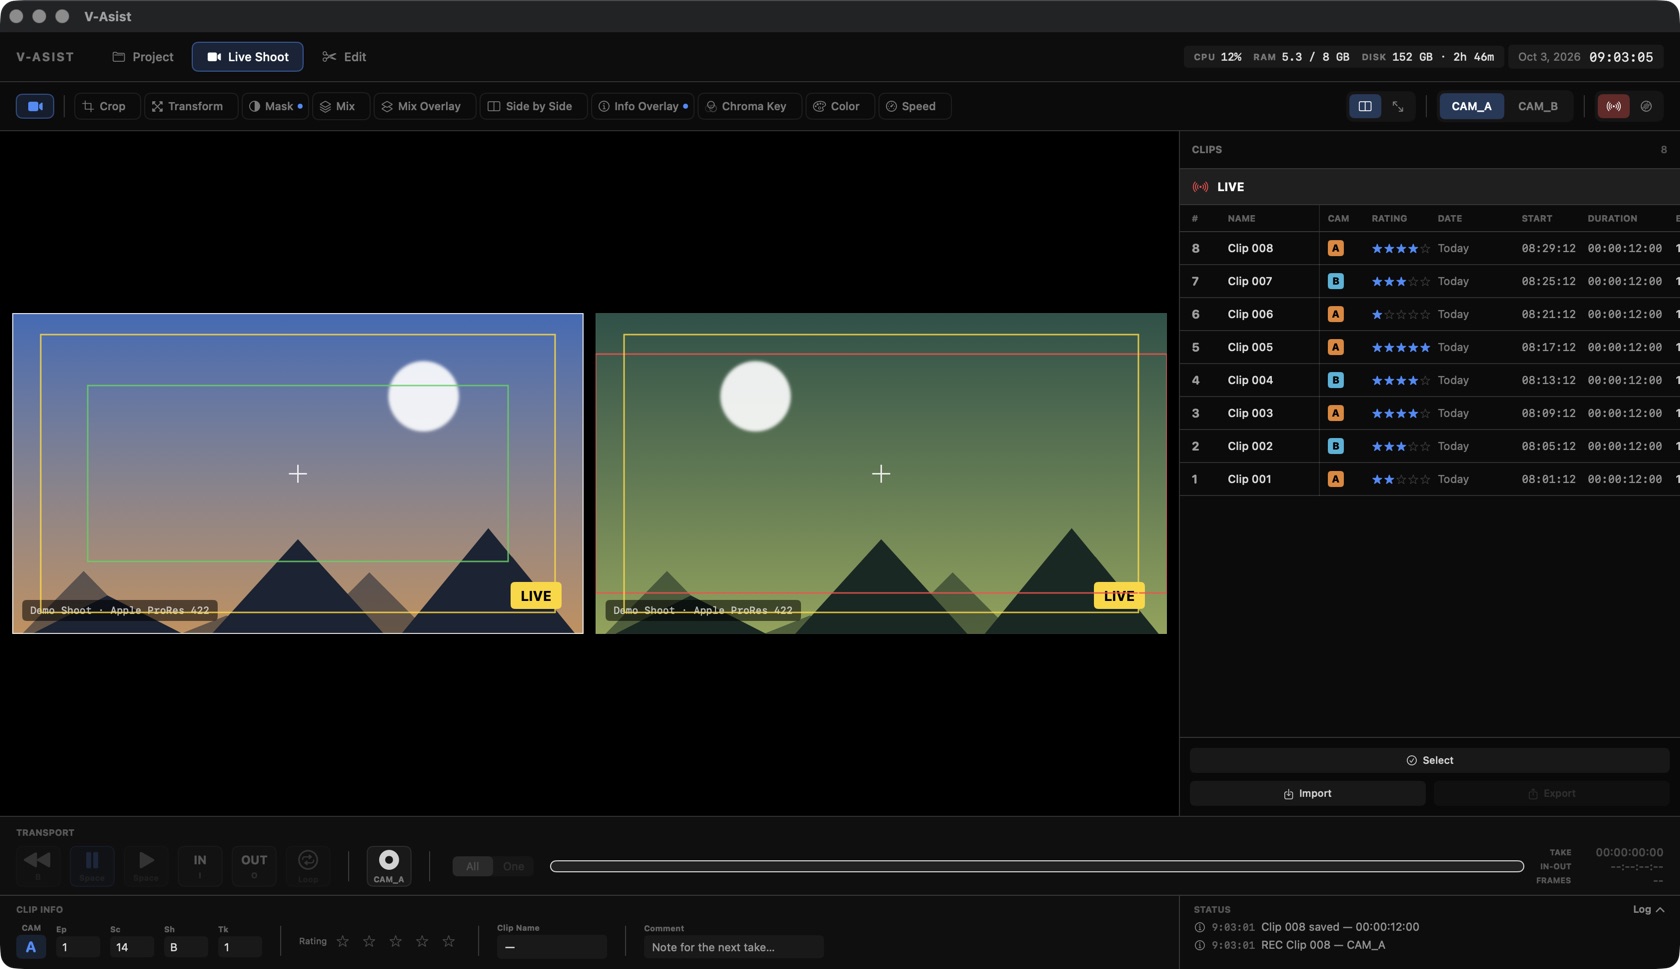
V-Asist has three rooms: Project (settings and projects), Live Shoot (the working screen) and Edit (sequences for review). The two header rows are always on top.
Header, top row
| Control | What it does |
|---|---|
| Project · Live Shoot · Edit | The rooms. Also ⇧1 ⇧2 ⇧3. |
| CPU · RAM · DISK | Whole-Mac CPU, memory used / total, free space on the recording drive and roughly how much recording time that is at the current codec and size. Orange, then red, when it's getting tight. |
| Stream viewers | While the network stream is on: how many iPhones / iPads are watching. |
| Date and clock | Time of day. |
Header, second row
| Control | What it does |
|---|---|
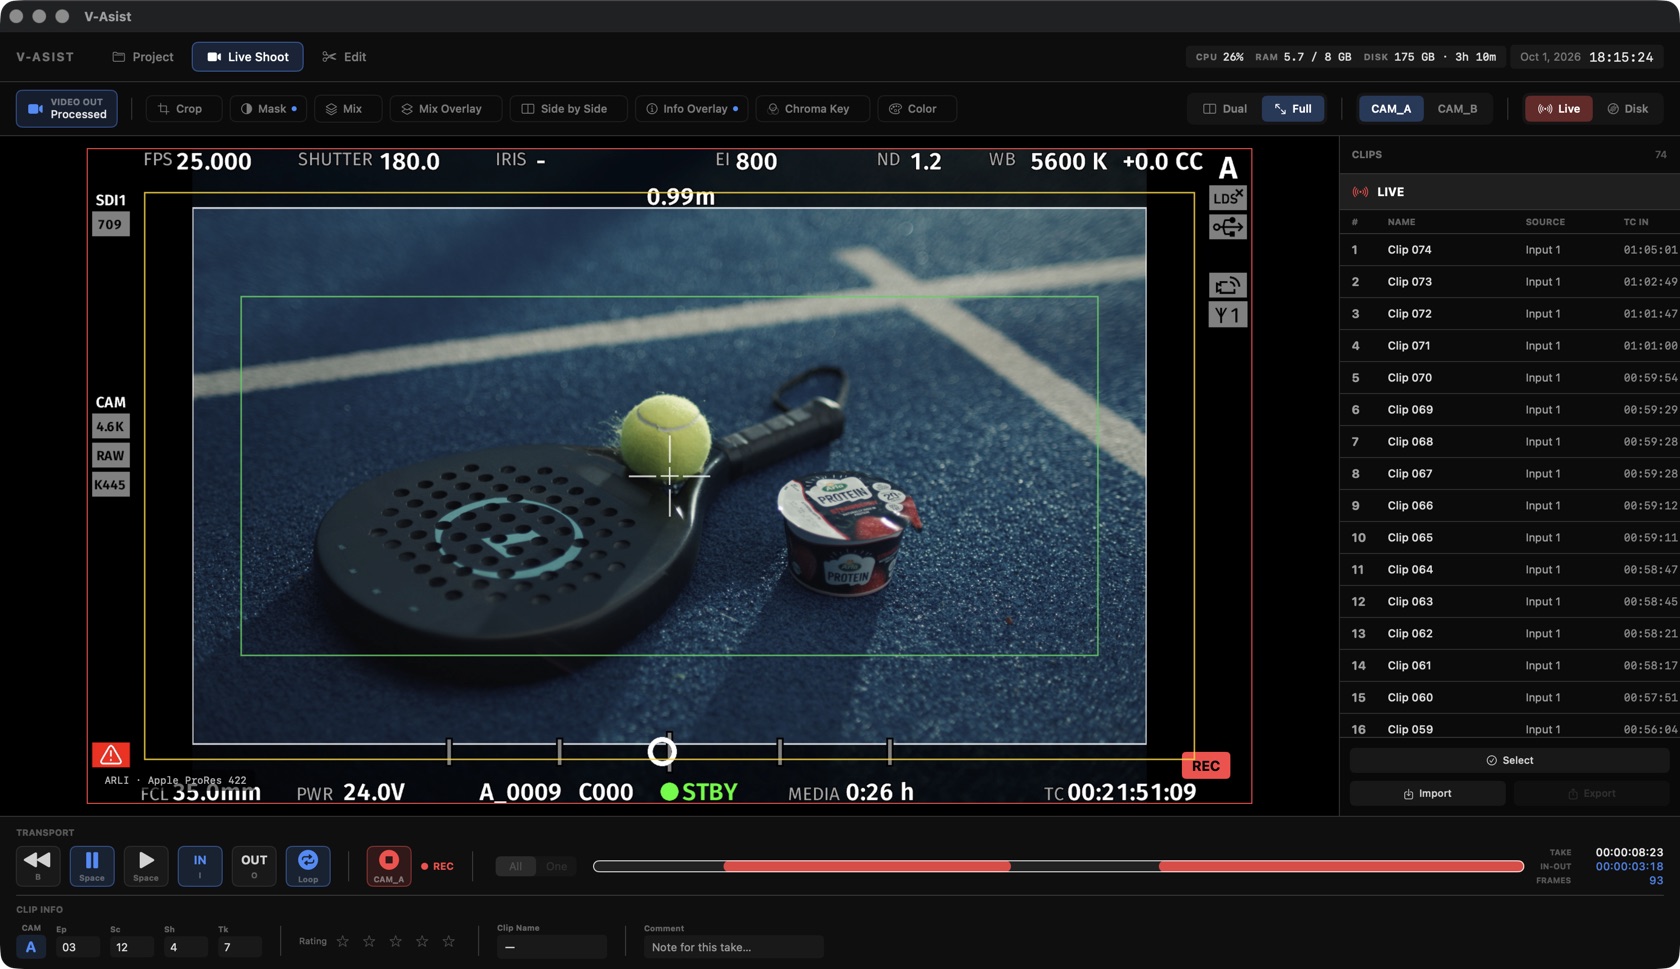
| VIDEO OUT | What the SDI output carries: Processed (what you see) or Live Passthrough (hardware, near-zero delay). See SDI output. |
| Crop … Speed | The ten monitor tools. Click one (or ⌃1…⌃0) to open its controls in a third row; click again or press Esc to close. A dot means the tool is on for the active view. |
| Dual · Full | Both views side by side, or only the active one, full size (D). |
| CAM_A · CAM_B | Which view is active (1 2). The transport, slate and tool controls always follow the active view. |
| Live · Disk | The active view's source: the live camera, or a recorded take (9 0). |
On narrower windows the buttons pack tighter, then collapse to icons; every button keeps its name and shortcut as a tooltip.
The views
- A white border marks the active view; it turns red while recording.
- The badge bottom right shows the state: LIVE, REC, PLAY or PAUSED.
- Info Overlay (bottom left) shows project, codec, timecode and durations when switched on.
- F hides everything except the picture; F again brings it back.
Footer
Left: Transport on top, Clip Info (the slate) below. Right, under the clip list: the Status panel. Every footer control is described in chapter 6, 10 and 11.
Slate (Clip Info)
| Field | What it does |
|---|---|
| CAM | Camera letter, filled in from the active input. |
| Ep · Sc · Sh · Tk | Episode, scene, shot, take. Stamped onto each take when recording stops; the take number counts up by itself. |
| Rating | One to five stars. On Disk it rates the loaded take (the same stars as in the clip list); on Live, the take being recorded or the next one. Click the same star again to clear. |
| Clip Name | The take loaded in the active view. |
| Comment | On Disk: a note on the loaded take. On Live: a note for the take being recorded, or the next one. |
03
Auto-REC
The camera operator hits REC and V-Asist is already recording. Two independent switches in Project ▸ Automation:
- Camera SDI REC flag: the REC bit the camera sends inside SDI. ARRI's flag is decoded by the AJA driver; Blackmagic cameras embed a REC trigger. Takes start and stop exactly with the camera. Use this first.
- Camera timecode (Rec Run): for cameras without a REC flag. Frozen timecode means stopped, running means recording. Free Run timecode keeps running when idle, so it can't start a take; on Blackmagic, timecode can only stop one.
With both on, the REC flag decides whenever the camera sends one, and timecode is the fallback. R or the REC button always works by hand. When a take starts, the active view switches to Live by itself.
04
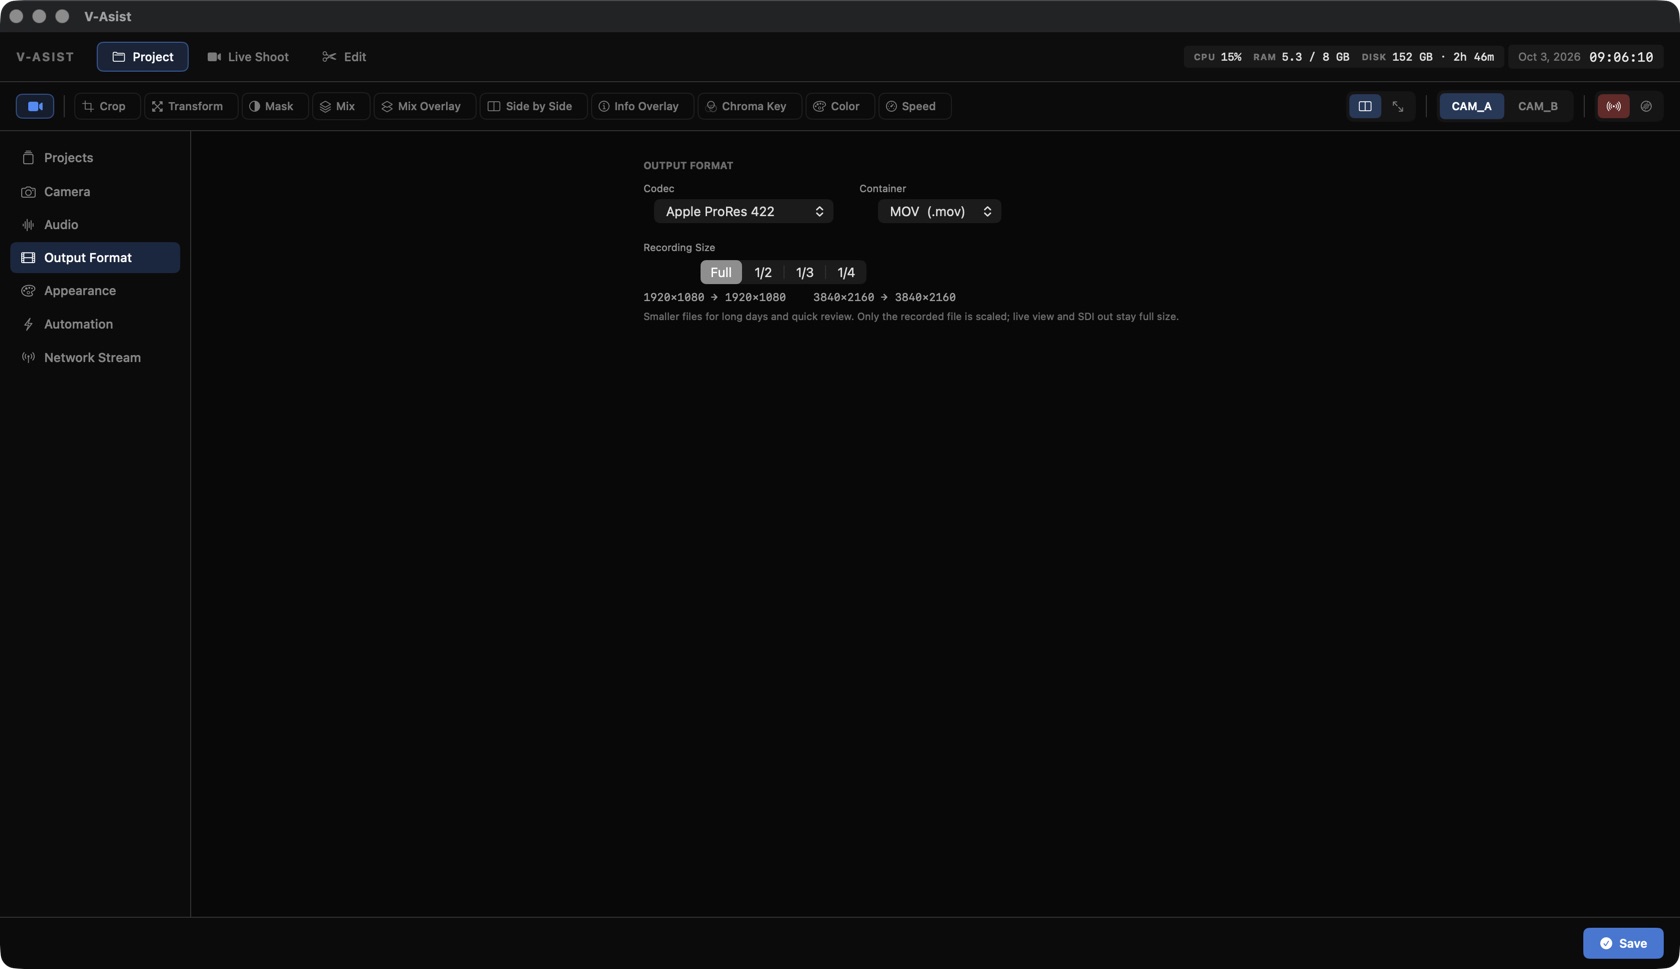
Recording formats
| Setting | Options |
|---|---|
| Codec | Apple ProRes 422, ProRes 422 HQ, H.264 (DNxHD is written as ProRes 422). |
| Container | MOV or MP4. |
| Recording size | Full, 1/2, 1/3 or 1/4 of the input. 1080p becomes 960×540, 640×360 or 480×270. Only the file is scaled; the live view and SDI out stay full size. |
Measured on 3-second 1080p25 ProRes 422 HQ takes: Full 71 MB, 1/2 27 MB, 1/3 16 MB, 1/4 10 MB. The DISK readout in the header shows how much recording time is left at the current codec and size.
05
Audio
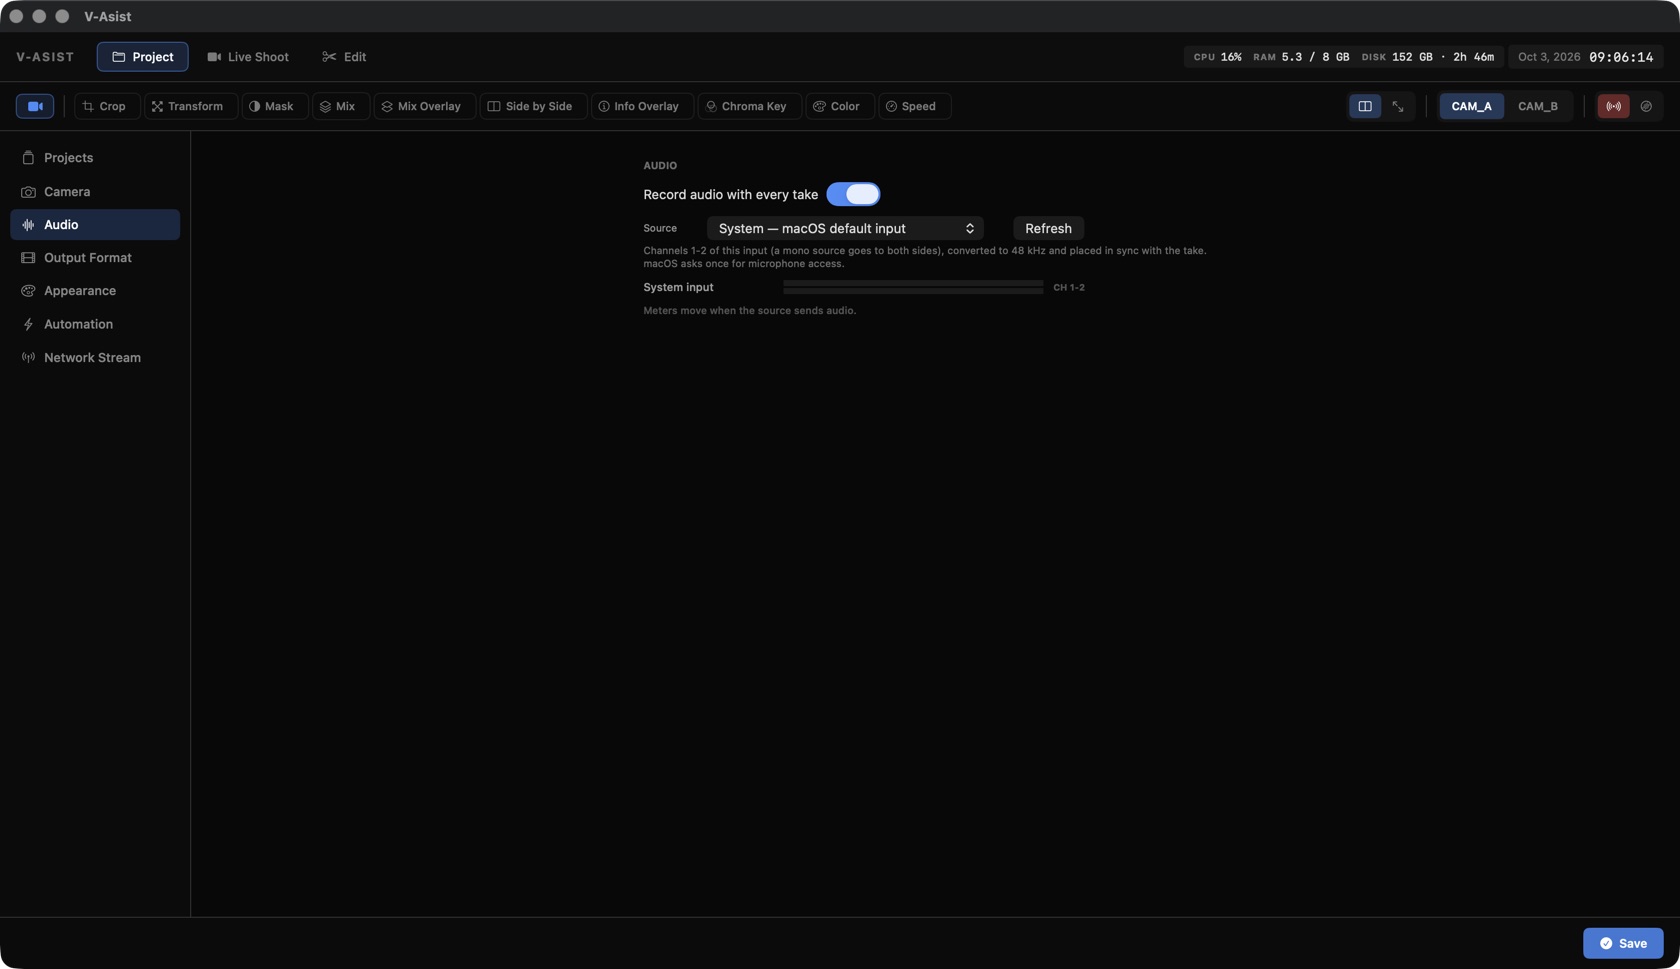
Turn on Project ▸ Audio ▸ Record audio with every take and choose the source:
| Source | Where the sound comes from |
|---|---|
| SDI | The audio embedded in each input's SDI signal (AJA and Blackmagic). |
| System | macOS's default input, as set in System Settings ▸ Sound. |
| A device | Any input by name: the Mac's microphone, a USB or Thunderbolt audio interface, AJA's CoreAudio device, an iPhone via Continuity. |
Channels 1–2 are recorded as stereo at 48 kHz (a mono source goes to both sides): 16-bit PCM in MOV, AAC in MP4. Audio is placed against the take's first video frame, on the same clock as the video, and stays continuous even when a video frame is dropped. Level meters show in the Audio tab and next to REC.
06
Transport, IN / OUT and playback
Transport, left to right
| Button | What it does |
|---|---|
| ⏪ (B) | Play in reverse, from OUT down to IN. |
| ⏸ (Space) | Pause. |
| ▶ (Space) | Play from IN. With nothing loaded, Space plays the last take. |
| IN (I) | Mark IN. Hold the button 1 s to clear just the IN. |
| OUT (O) | Mark OUT. Hold the button 1 s to clear just the OUT. Delete clears both. |
| Loop | Play around and around: the whole set of pairs in All, the same pair in One. |
| REC · CAM | Record / stop by hand (R); shows which camera is recorded, the audio meter and the live dropped-frame count. |
| All · One | All: Play runs through every IN/OUT pair in turn, jumping the gaps. One: only the pair you click on the bar. |
| Timeline | Recording: the marked ranges in red. Disk: the IN/OUT range in the accent color, drag to scrub, click a pair to select it. |
| TAKE · IN-OUT · FRAMES | Take length, length of the current IN/OUT, and its frame count. |
Marking while rolling
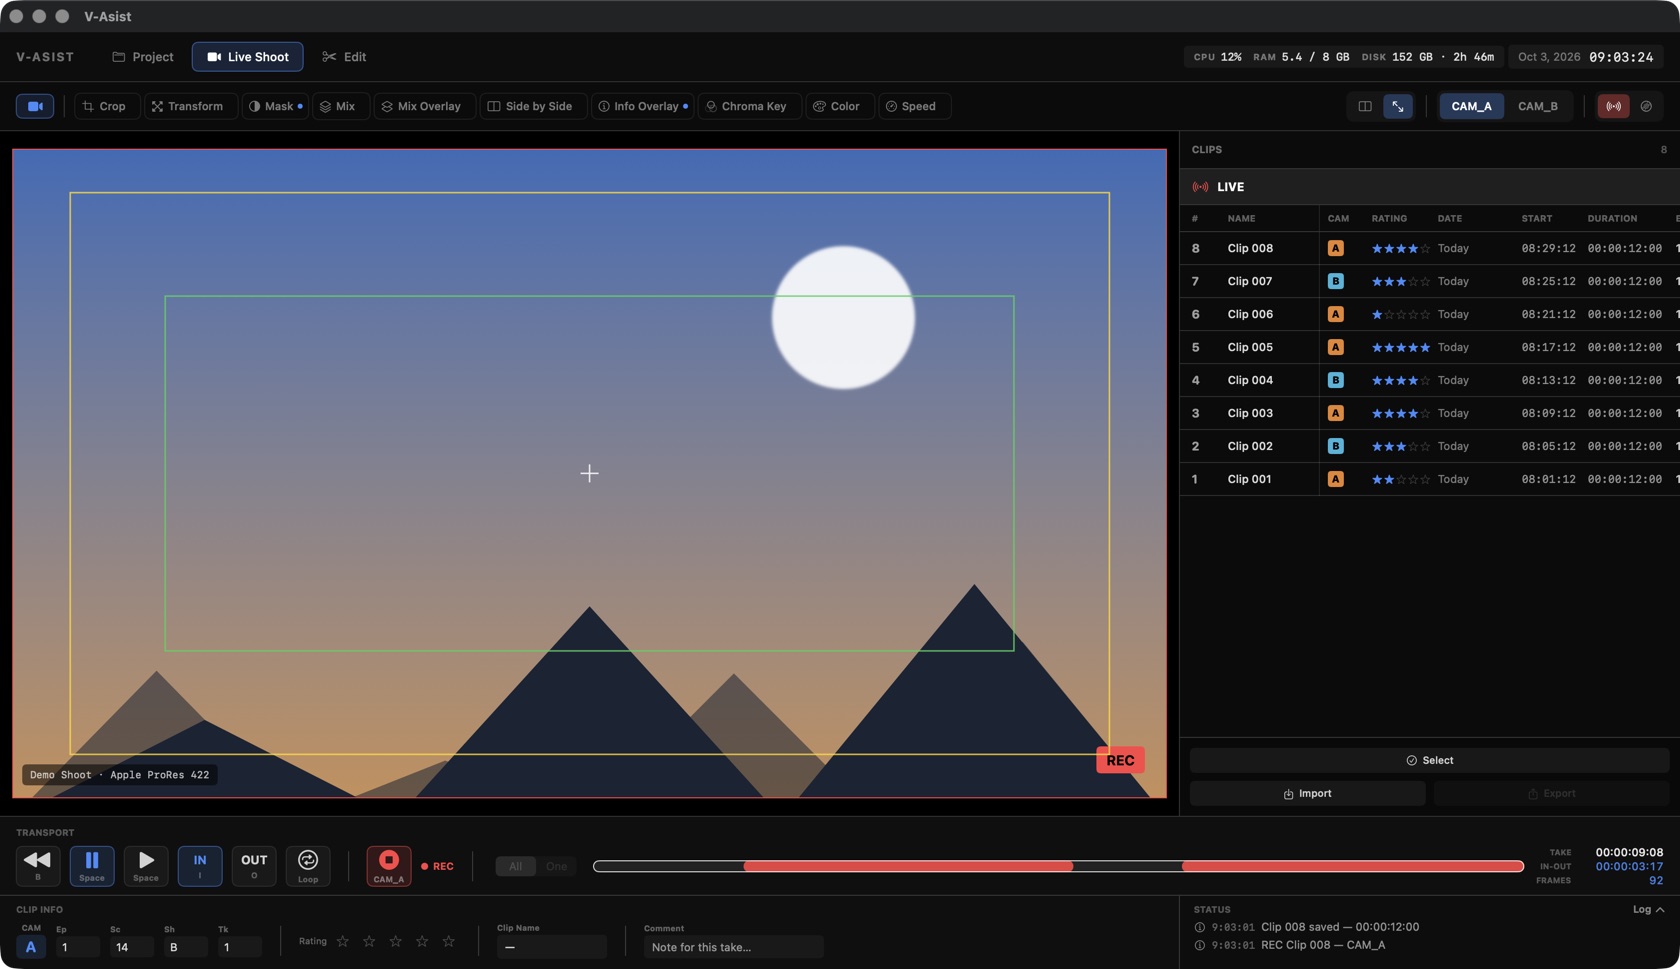
- I / O set IN and OUT; a new IN after an OUT starts another pair. An open IN runs red up to "now".
- Marks belong to the take, so switching views or inputs mid-take never loses them.
Playing back
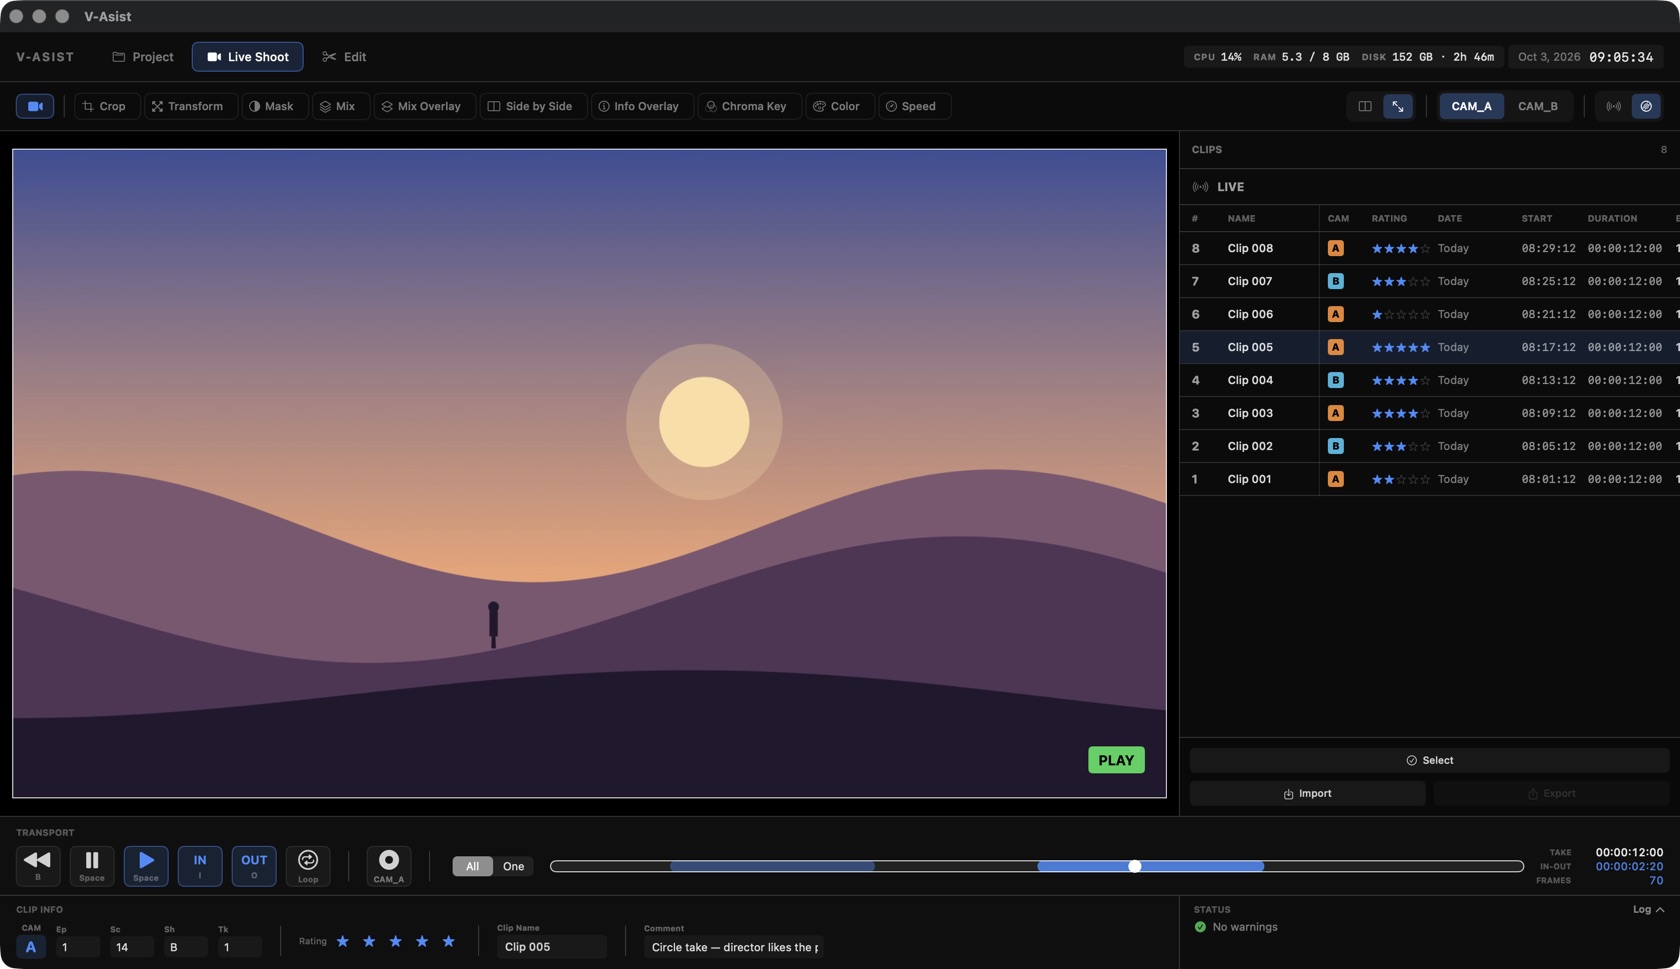
| Key | What it does |
|---|---|
| [ ] | Previous / next pair. With a single pair: restart / go to the end. |
| ← → | One frame back / forward, exact on every clip; hold to repeat. |
| ↑ ↓ | Previous / next take in the clip list (LIVE is at the top). |
OUT is hit frame-accurately, and Play always starts exactly at IN.
07
Speed, Clip Sync and Play Sync
The Speed tool (⌃0) changes how fast the active view's take plays, and links the two views' transport.
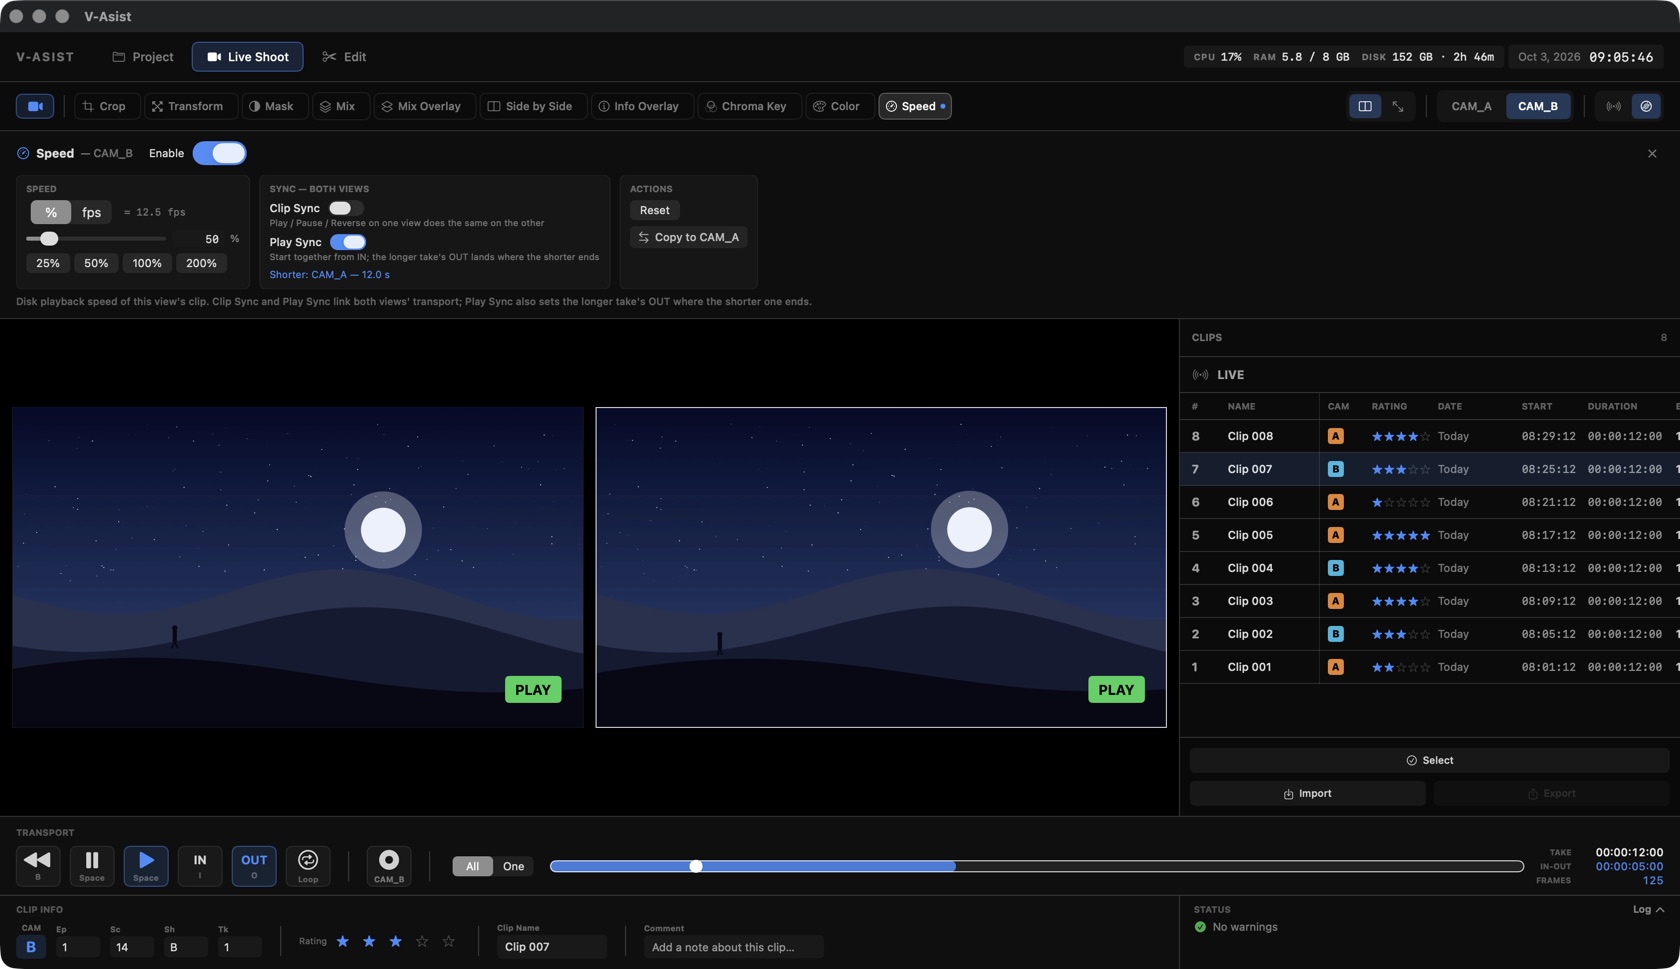
| Control | What it does |
|---|---|
| % · fps | Enter the speed as a percentage (5–400 %) or as the frame rate to play the clip at: a 50 fps take at 25 fps is 50 %. The other unit is shown next to it. Slider, typed value, or a preset (25 / 50 / 100 / 200 %, or 12 / 24 / 25 / 30 / 50 fps). |
| Enable | Switches the speed on or off for this view without losing the value. Works forward and in reverse, and changes while playing. |
| Clip Sync | Play, Pause and Reverse on one view does the same on the other, for two cameras of the same take. Both players start on the same frame. |
| Play Sync | Both views start together from their IN, on the same frame. The shorter take leads: the longer take's OUT is set where the shorter one ends (at each view's speed), so both stop together. Switch Play Sync off and the longer take's own OUT comes back; the clip itself is never changed. |
| Reset · Copy to | Back to 100 %; or the same speed on the other view. |
08
Monitor tools
Each tool is set per view (except Mix Overlay), with Copy to the other view. Tools apply on screen, on the Processed SDI out and on the stream, never to recordings.
| Tool | Key | What it does |
|---|---|---|
| Crop | ⌃1 | Mattes each edge (0–45 %), with Aspect Lock to move all four together. |
| Transform | ⌃2 | Scale, stretch, rotate and move the picture. See chapter 9. |
| Mask | ⌃3 | Rectangle or circle shading, a center cross, and up to three frame-line guides (1.33, 1.66, 1.77, 1.85, 2.35, 2.39) with color and size. |
| Mix | ⌃4 | A still image, GIF or video over the picture. See chapter 9. |
| Mix Overlay | ⌃5 | Input 1 over Input 2: Normal, Add or Multiply, with opacity; Main chooses the base layer. For matching a frame. |
| Side by Side | ⌃6 | Both inputs next to each other, horizontal or vertical. |
| Info Overlay | ⌃7 | Project, codec, timecode, total and IN-OUT durations on the picture. |
| Chroma Key | ⌃8 | A GPU keyer: green or blue, tolerance, softness, spill suppression. The background is black or the other input, e.g. a live plate behind the actor. |
| Color | ⌃9 | Exposure, contrast, saturation and temperature: a monitoring look. Double-click a value to zero it. |
| Speed | ⌃0 | Playback speed and the two sync switches. See chapter 7. |
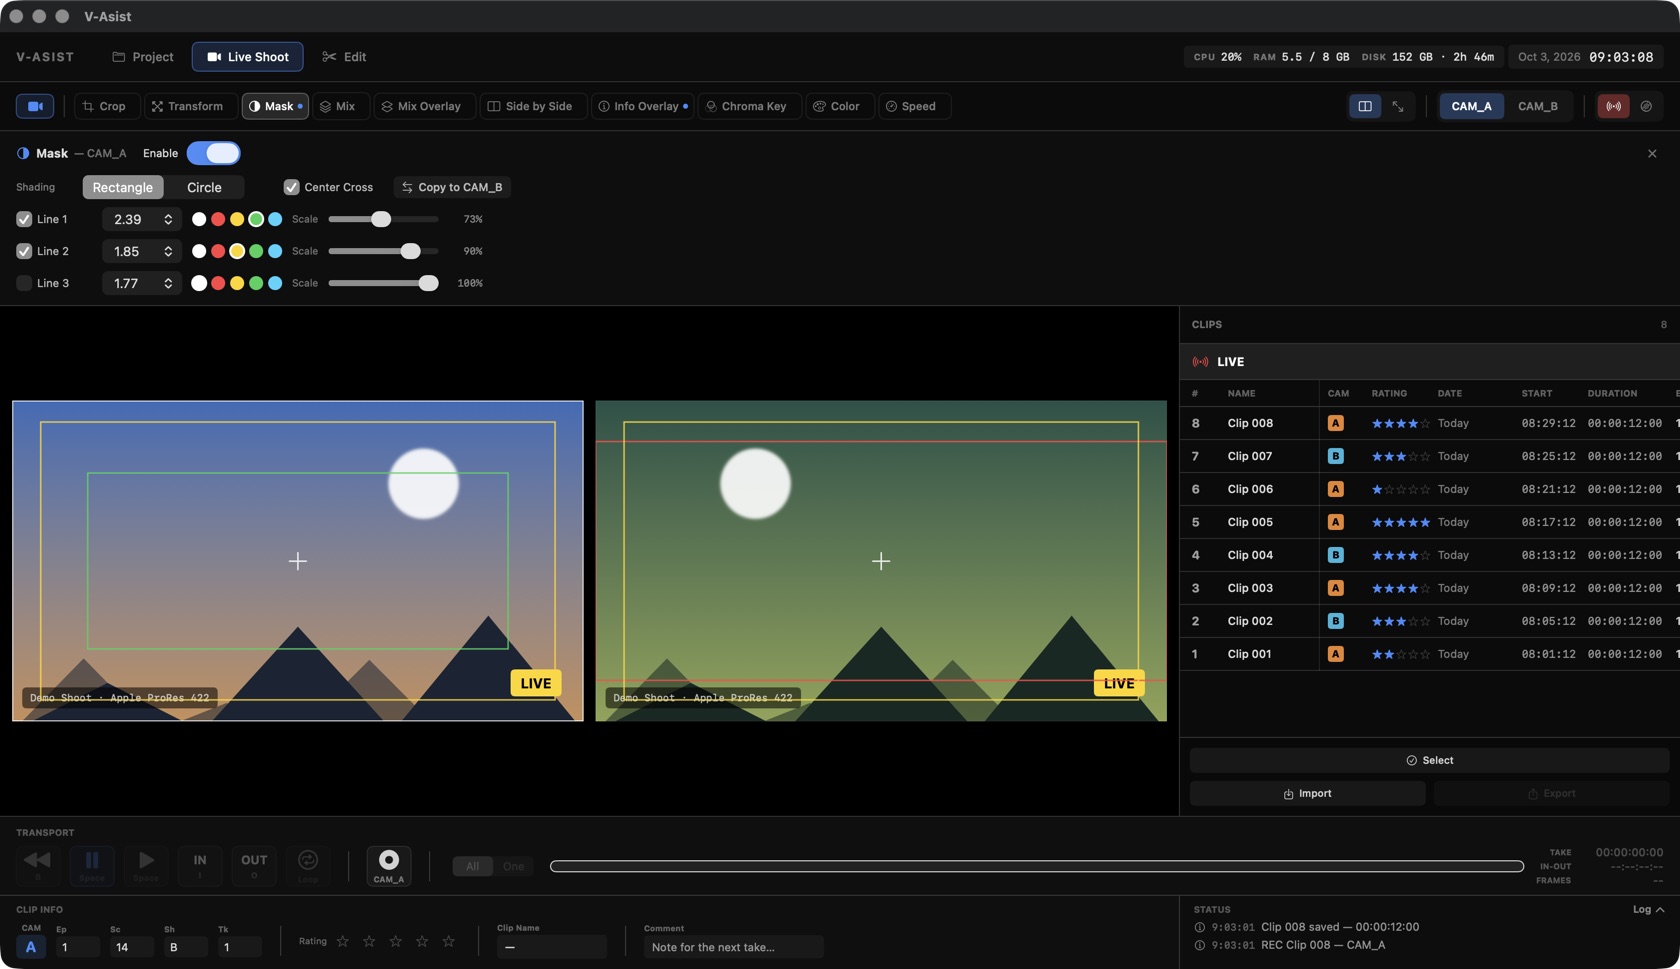
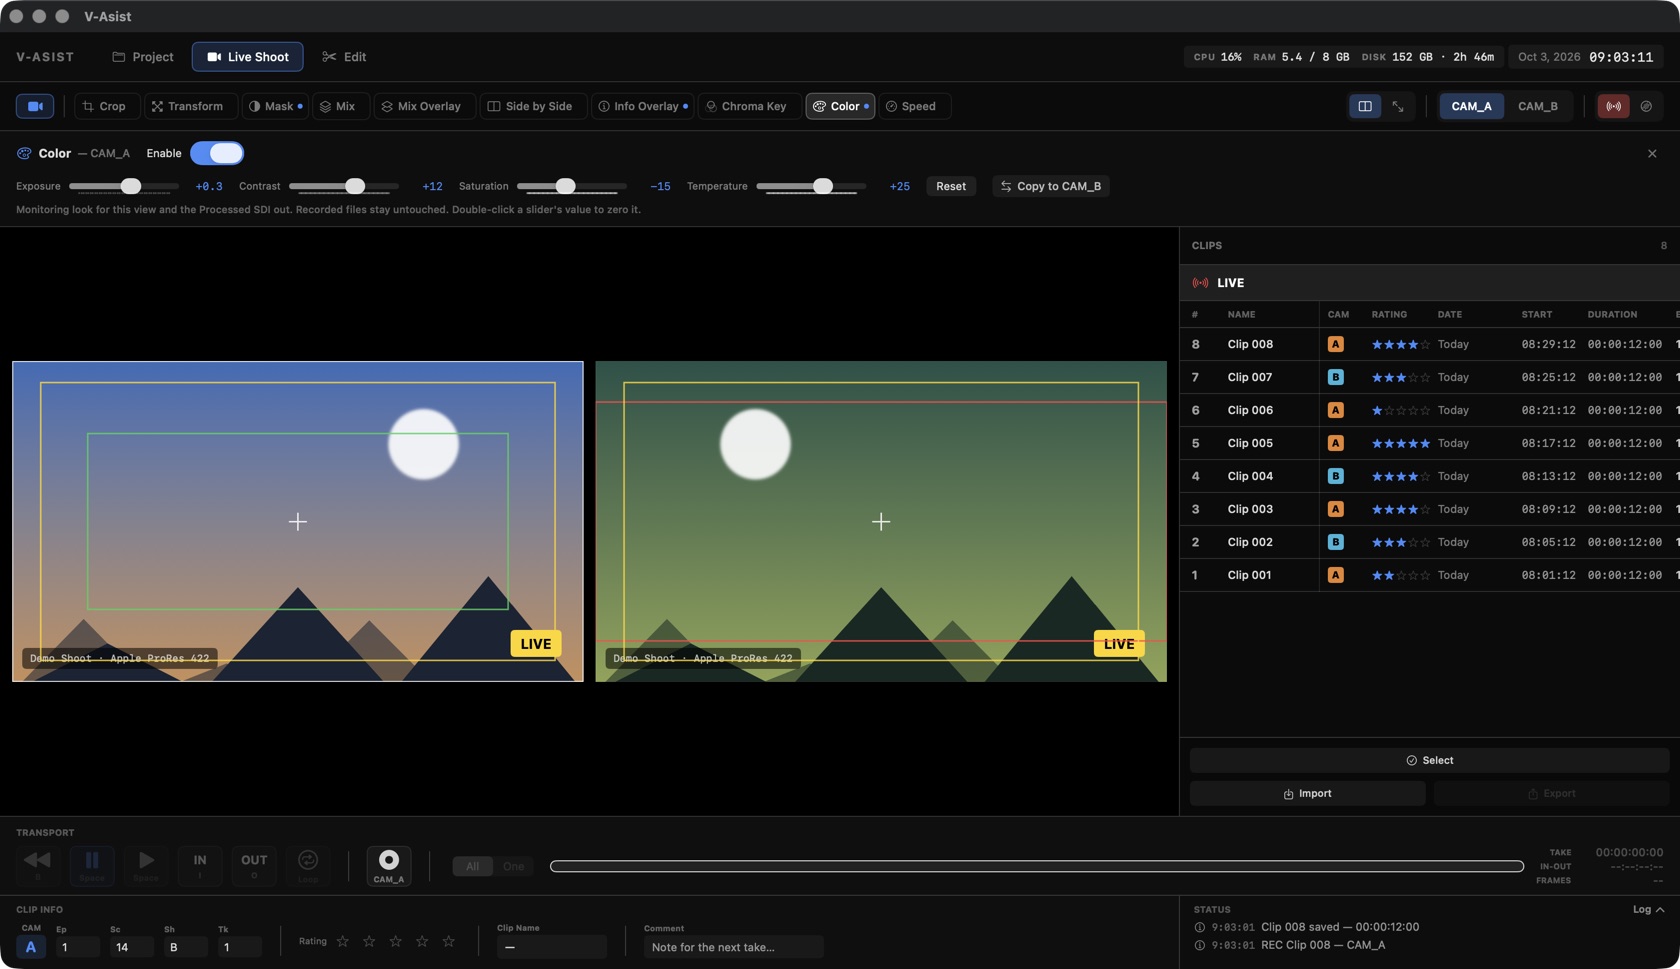
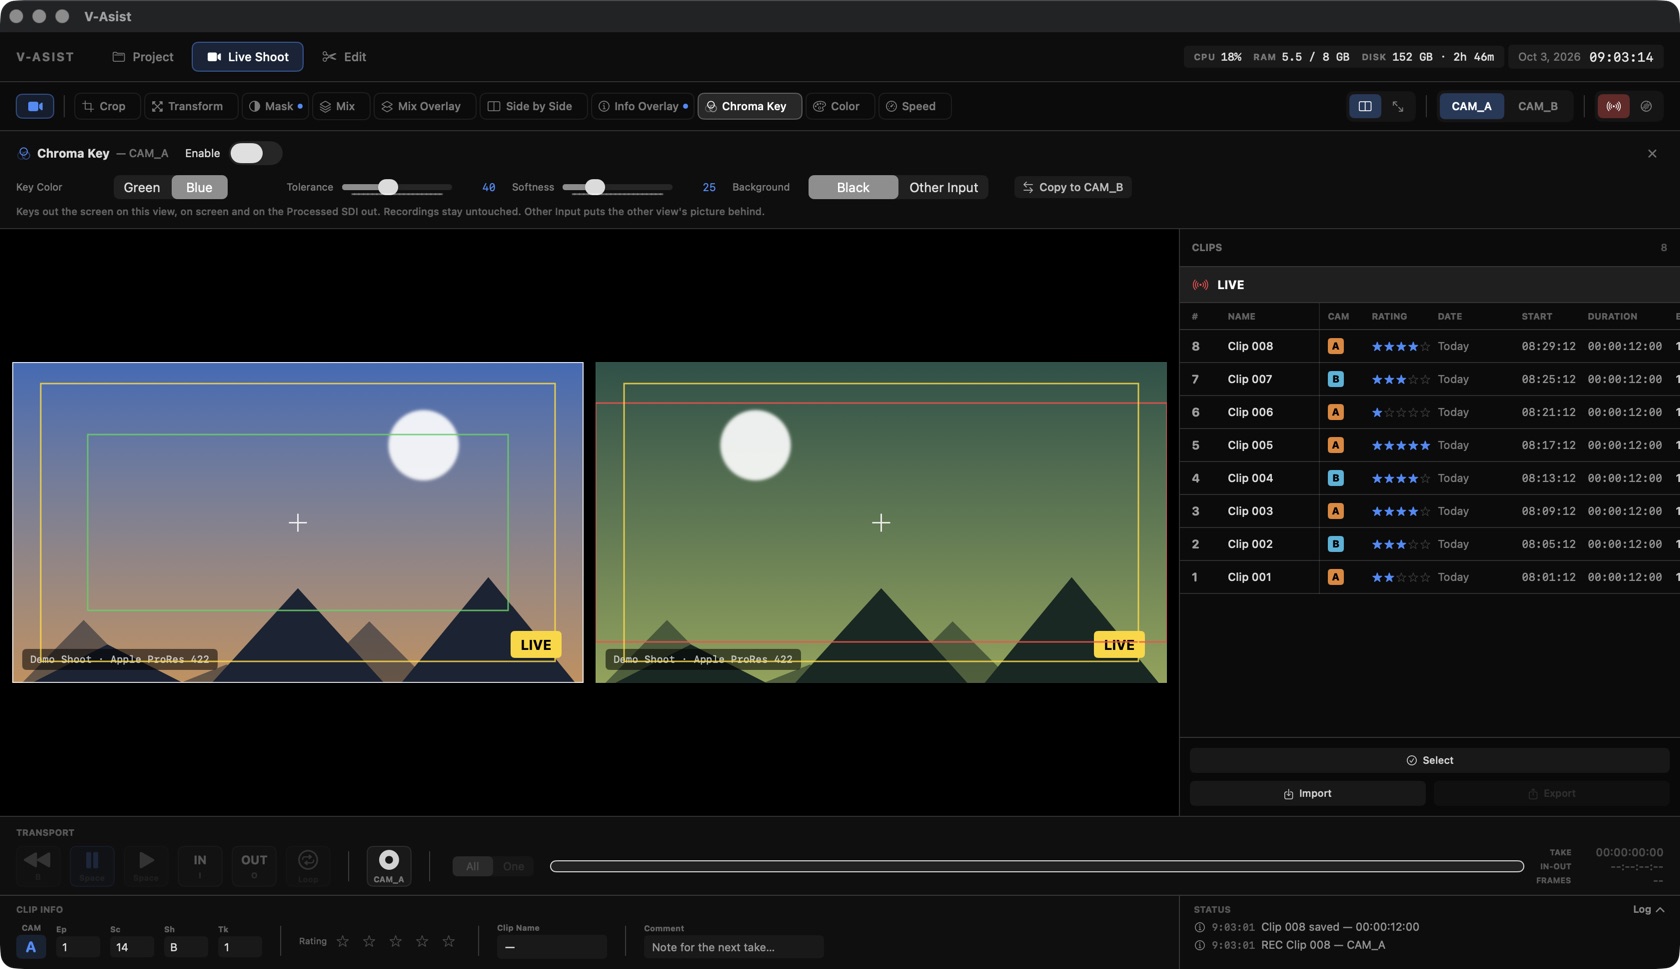
09
Transform and Mix
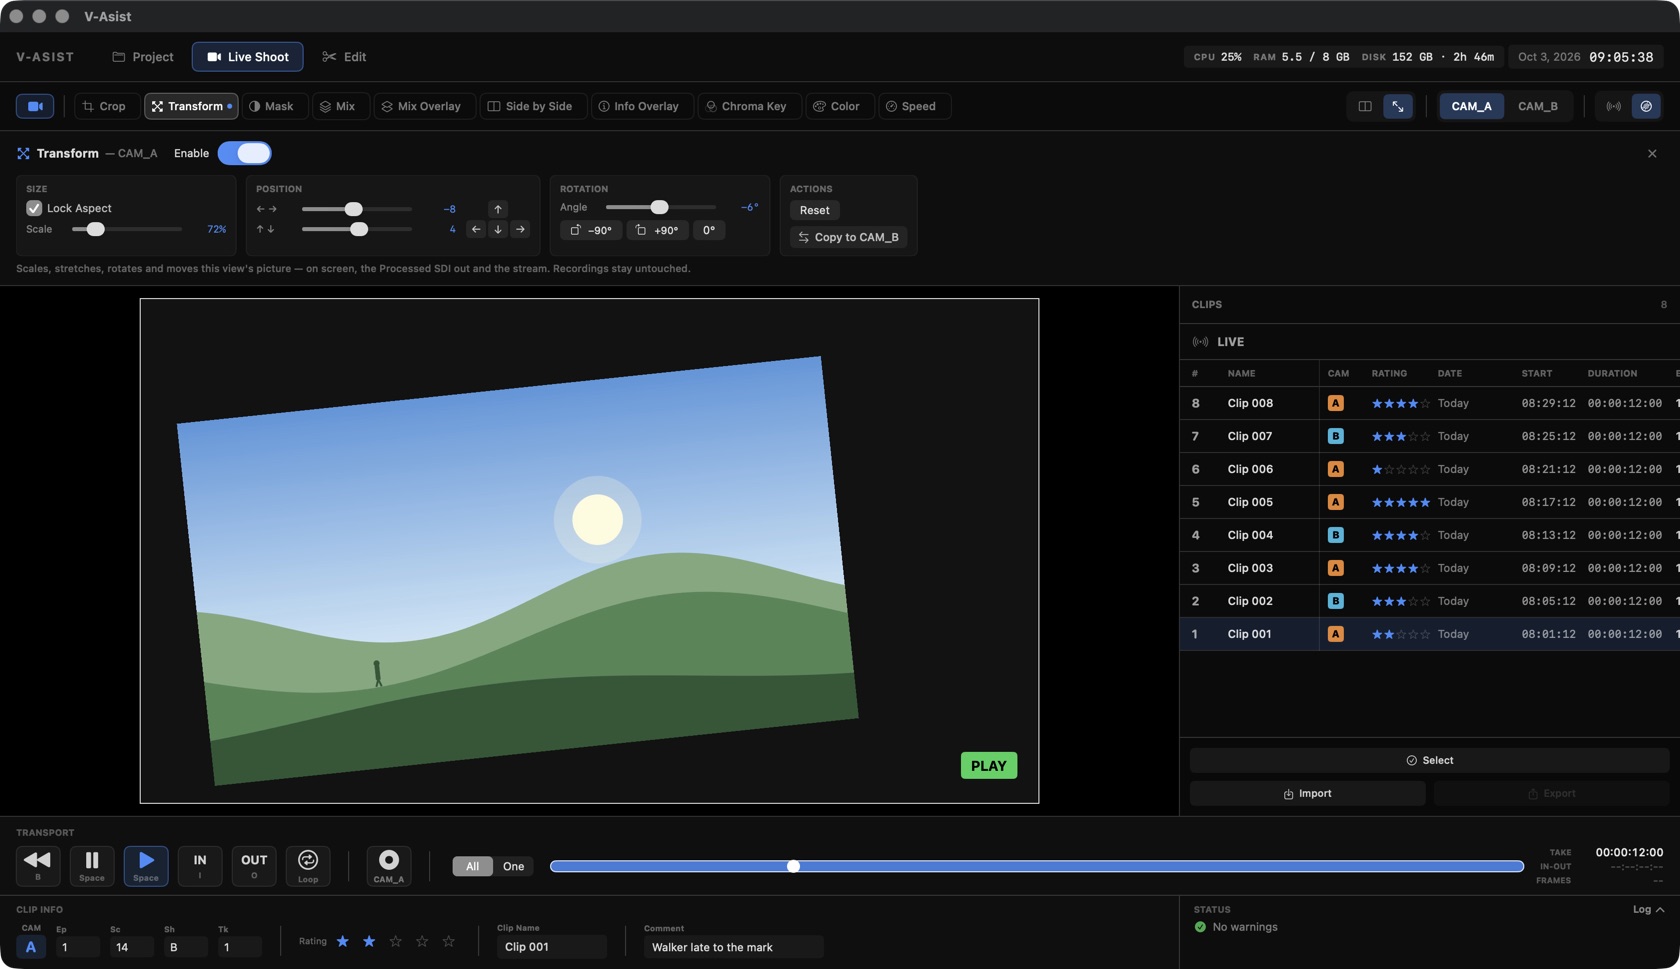
Both tools share one set of controls, grouped in sections.
| Section | Controls |
|---|---|
| Size | Lock Aspect on: one Scale (10–400 %). Off: Width and Height separately, to stretch or squeeze. |
| Position | ← → and ↑ ↓ sliders (−100…100 % of the view) and arrow buttons that move 1 % per click. |
| Rotation | Angle (−180…180°), −90°, +90° and 0°. |
| Actions | Reset size, position and rotation; Copy to the other view. |
Double-click any value to put it back to its default.
Transform
Scales, stretches, rotates and moves the view's own picture: to check a reframe, straighten a horizon or fill the monitor with a letterboxed image.
Mix
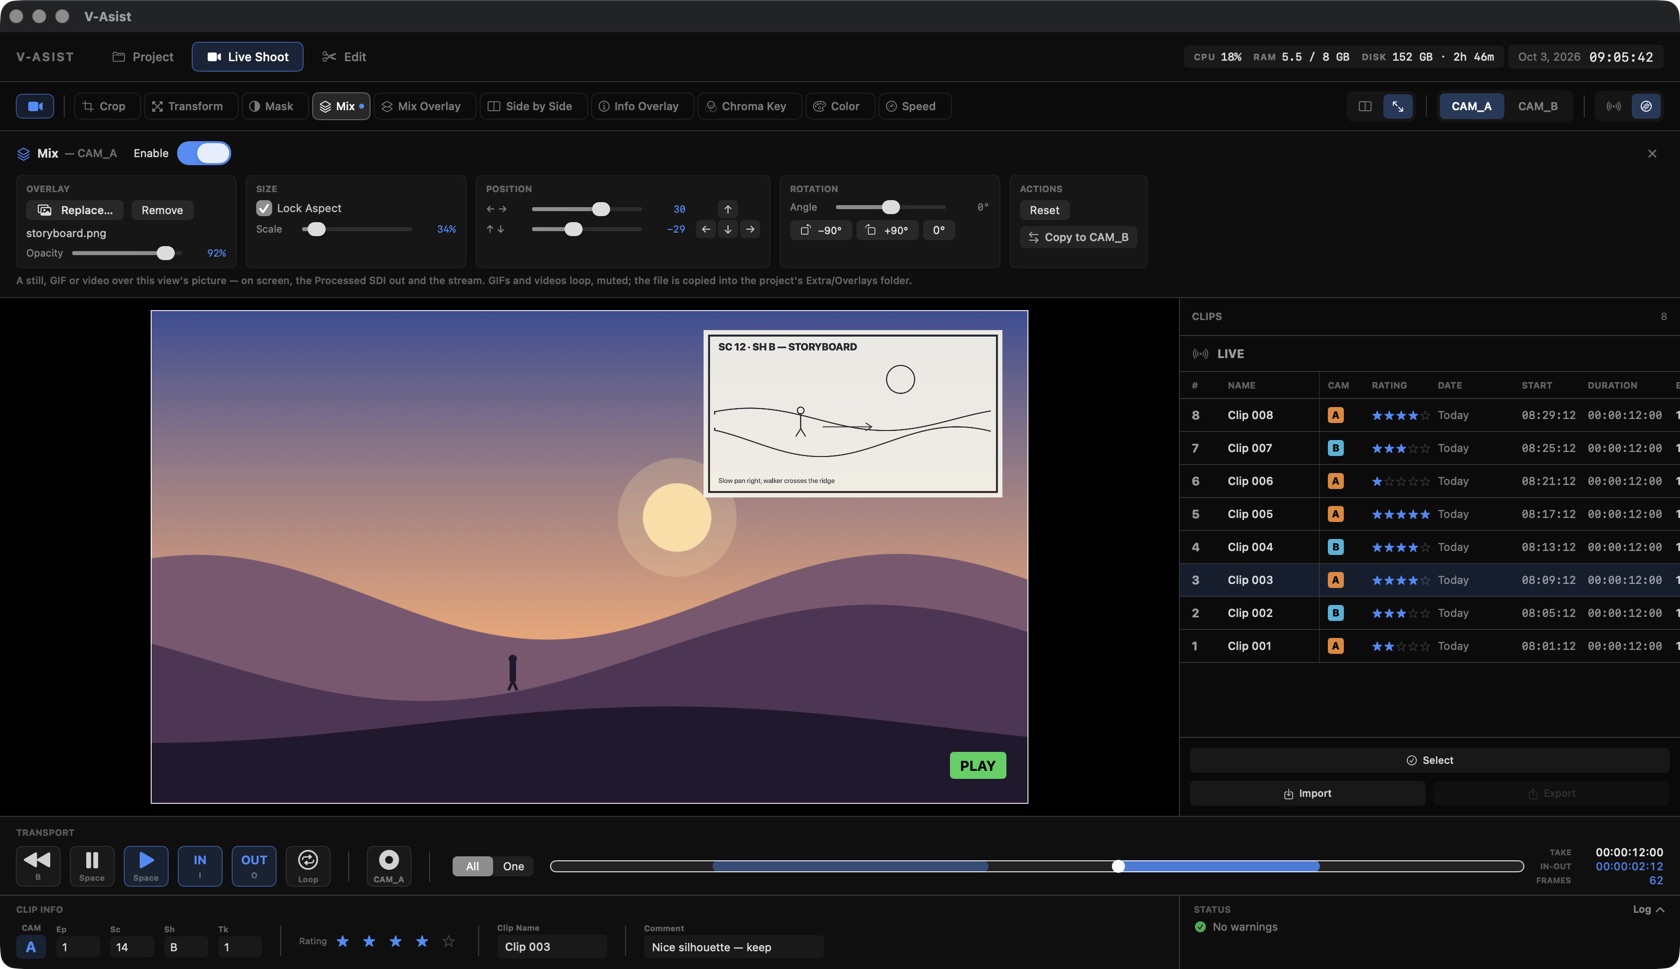
Lays a file over the picture: a storyboard frame, the previous setup for continuity, a logo, a GIF or a video.
- Choose File… takes PNG, JPEG, HEIC, TIFF, GIF, MOV or MP4. The file is copied into the project's
Extra/Overlaysfolder, so it moves with the project. - Opacity 0–100 %; a new file starts fully opaque. GIFs and videos loop, muted.
- Replace… swaps the file; Remove takes it off (the file stays in Overlays).
10
The clip list and rating
Every take of the project, newest first, with LIVE on top. Click a take to load it into the active view (Disk); click LIVE to go back to the camera.
| Column | |
|---|---|
| # · Name | Recording order and clip name; these two stay put while the rest scrolls sideways. |
| Cam | A or B. |
| Rating | Click a star to rate; the footer's stars show the same. |
| Date · Start · Duration | When REC started and how long the take is. |
| Ep · Sc · Sh · Tk | The slate. |
| Comment · TC In · Source | The note, the camera timecode at the first frame, and the input. |
Click a column title to sort by it; click again to reverse. The arrow keys follow the sorted order.
Thumbnail on hover
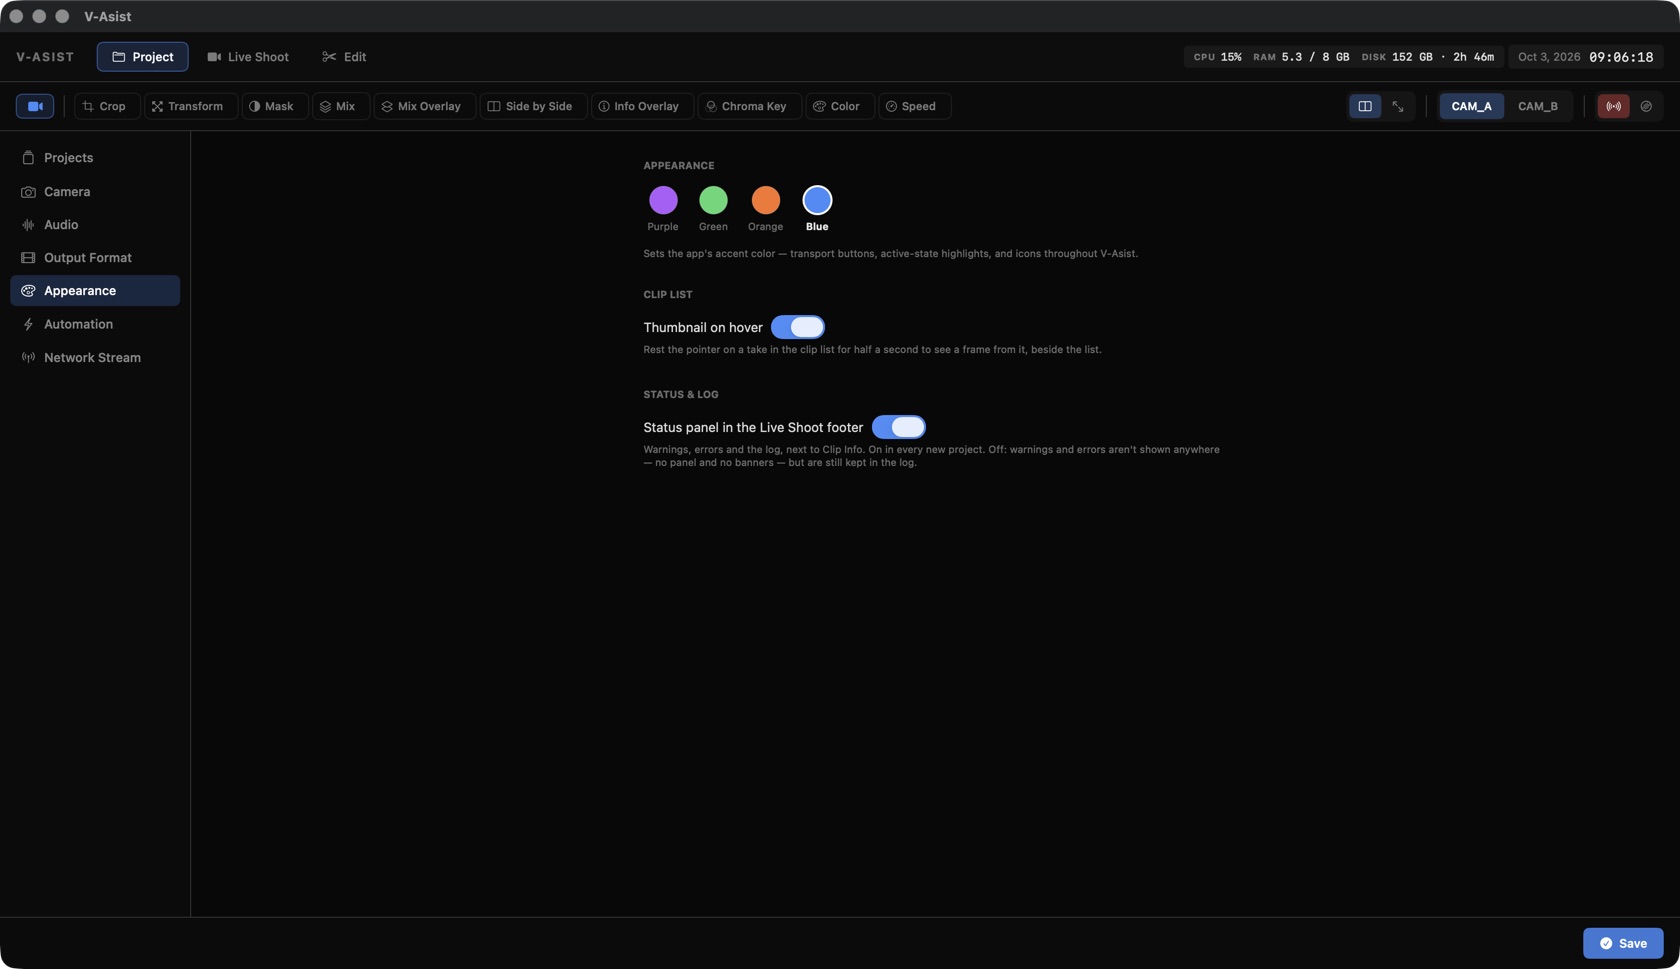
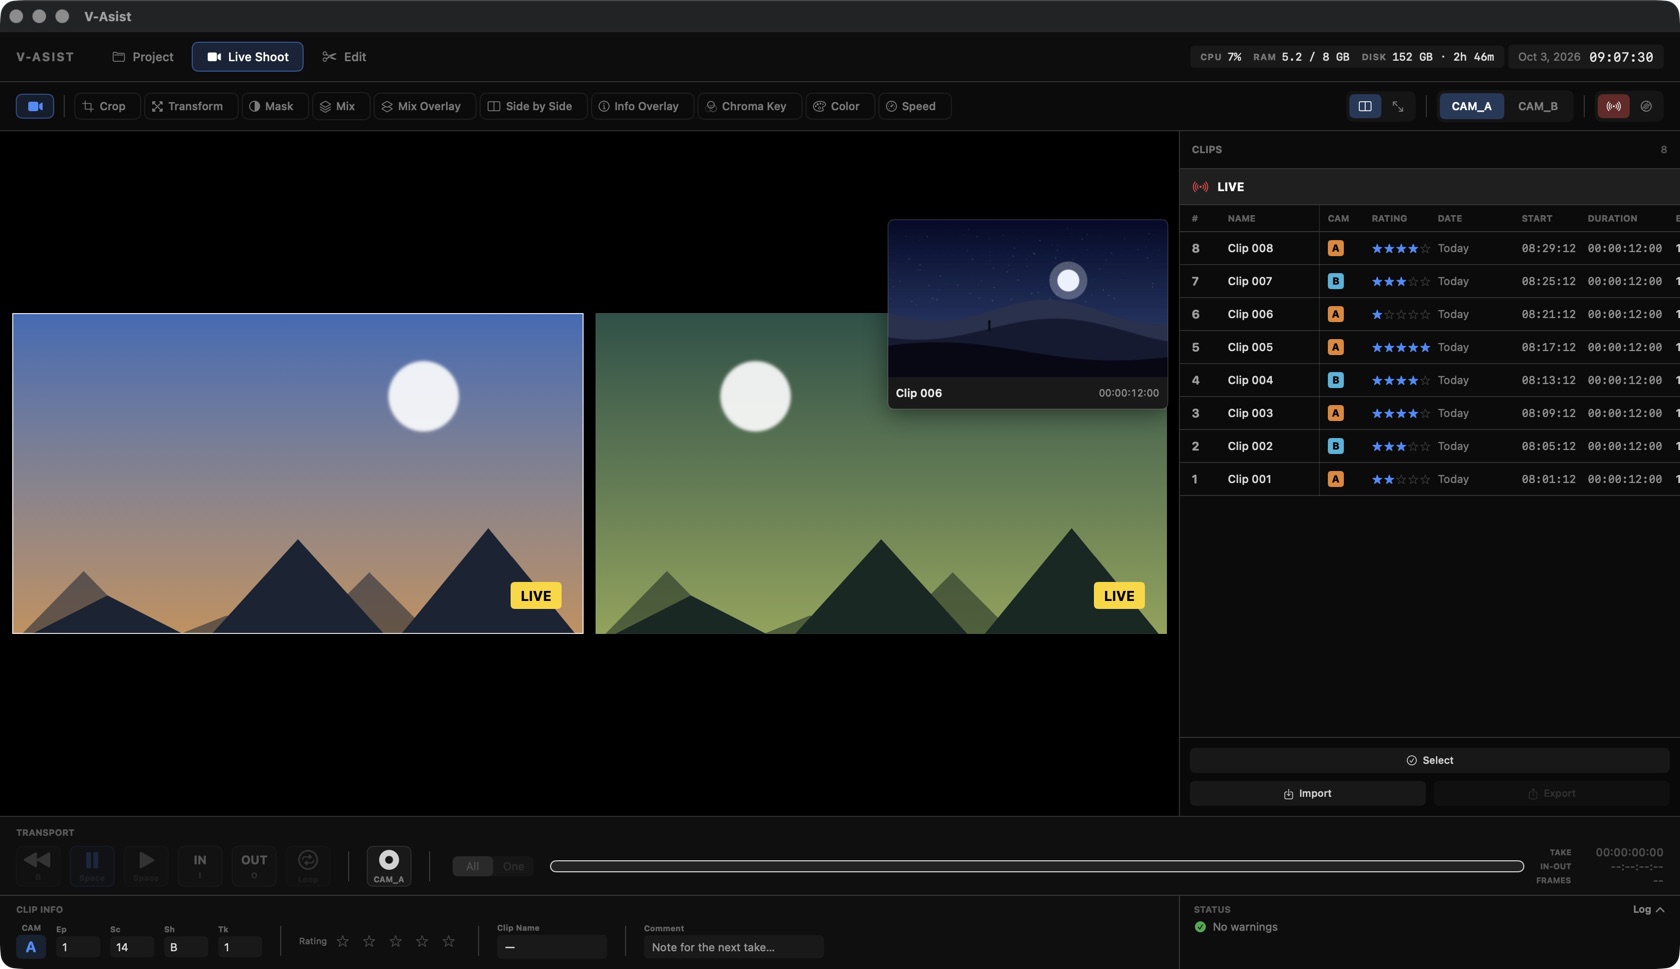
Rest the pointer on a take for half a second to see a frame from it, with its name and length, beside the list. Switch it off in Project ▸ Appearance.
Rating by keyboard
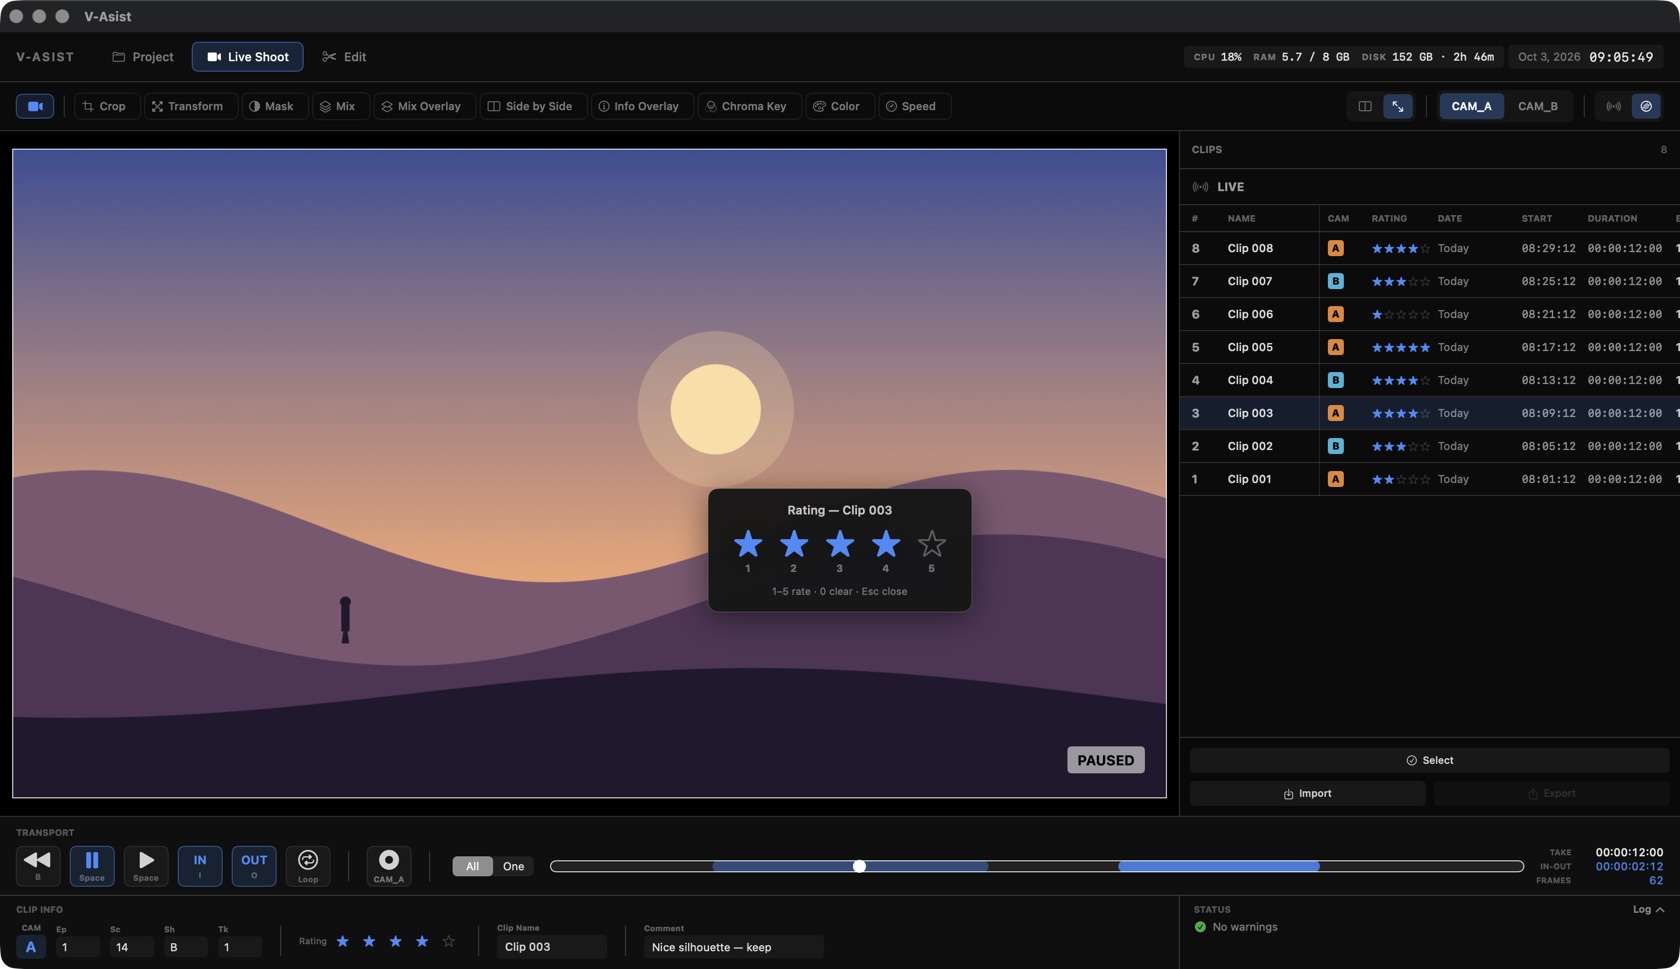
⌥A opens a small rating window over the picture. Press 1–5 to light that many stars, 0 to clear, Esc to close. It rates the loaded take on Disk, or the take being recorded / the next one on Live, and closes itself.
Select, Import, Export, Delete
| Button | What it does |
|---|---|
| Select | Clicks build a selection instead of loading: ⇧-click extends, ⌘-click toggles, ⌘A selects all. |
| Import | Adds existing movie files to the list. |
| Export | Shot log, EDL, XML and optional media copies for the selected takes (see chapter 15). |
| Delete | In Select mode: deletes the selected takes' files and rows, after asking. |
11
Status panel and log
Warnings and errors have their own place under the clip list, next to Clip Info, instead of covering the picture.
- The current problem stays on top in a frame: red for an error (not recording, the drive almost full, a take that couldn't be saved), orange for a warning (dropped frames, an AJA app holding the card). ✕ dismisses it; it stays in the log.
- Below it, the latest lines: REC started, take saved with its length, project actions.
- The badge next to STATUS counts warnings and errors.
- Click the panel (or Log) for the whole session's log, newest first, with Copy All and Clear. Esc closes it.
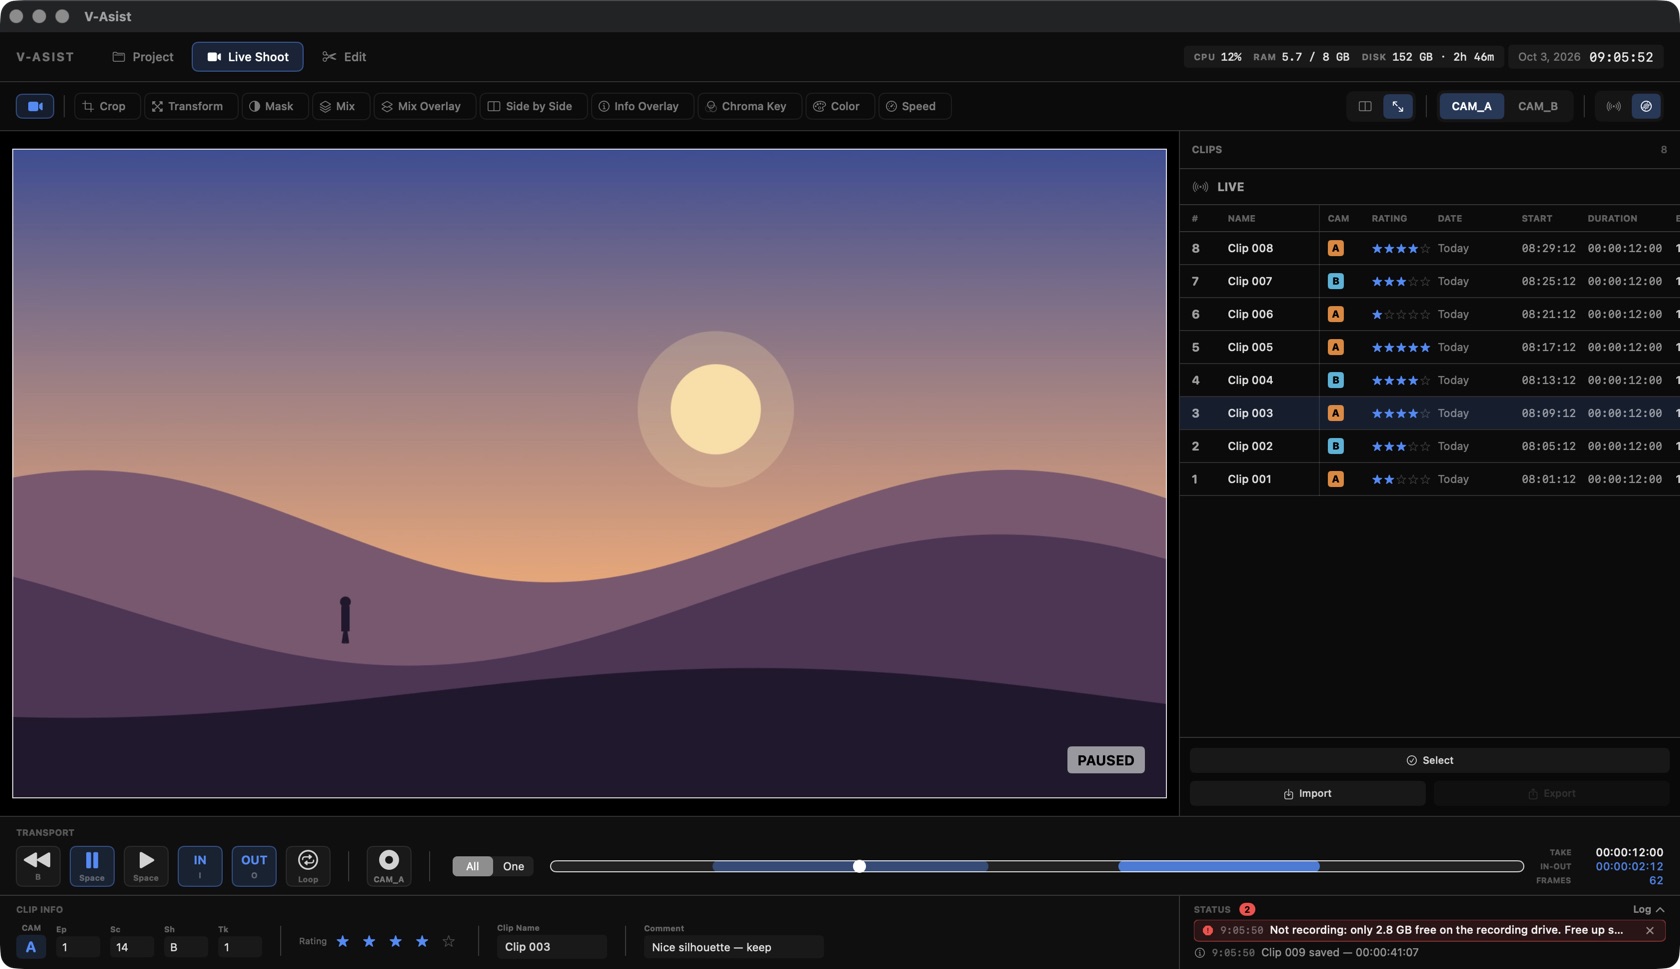
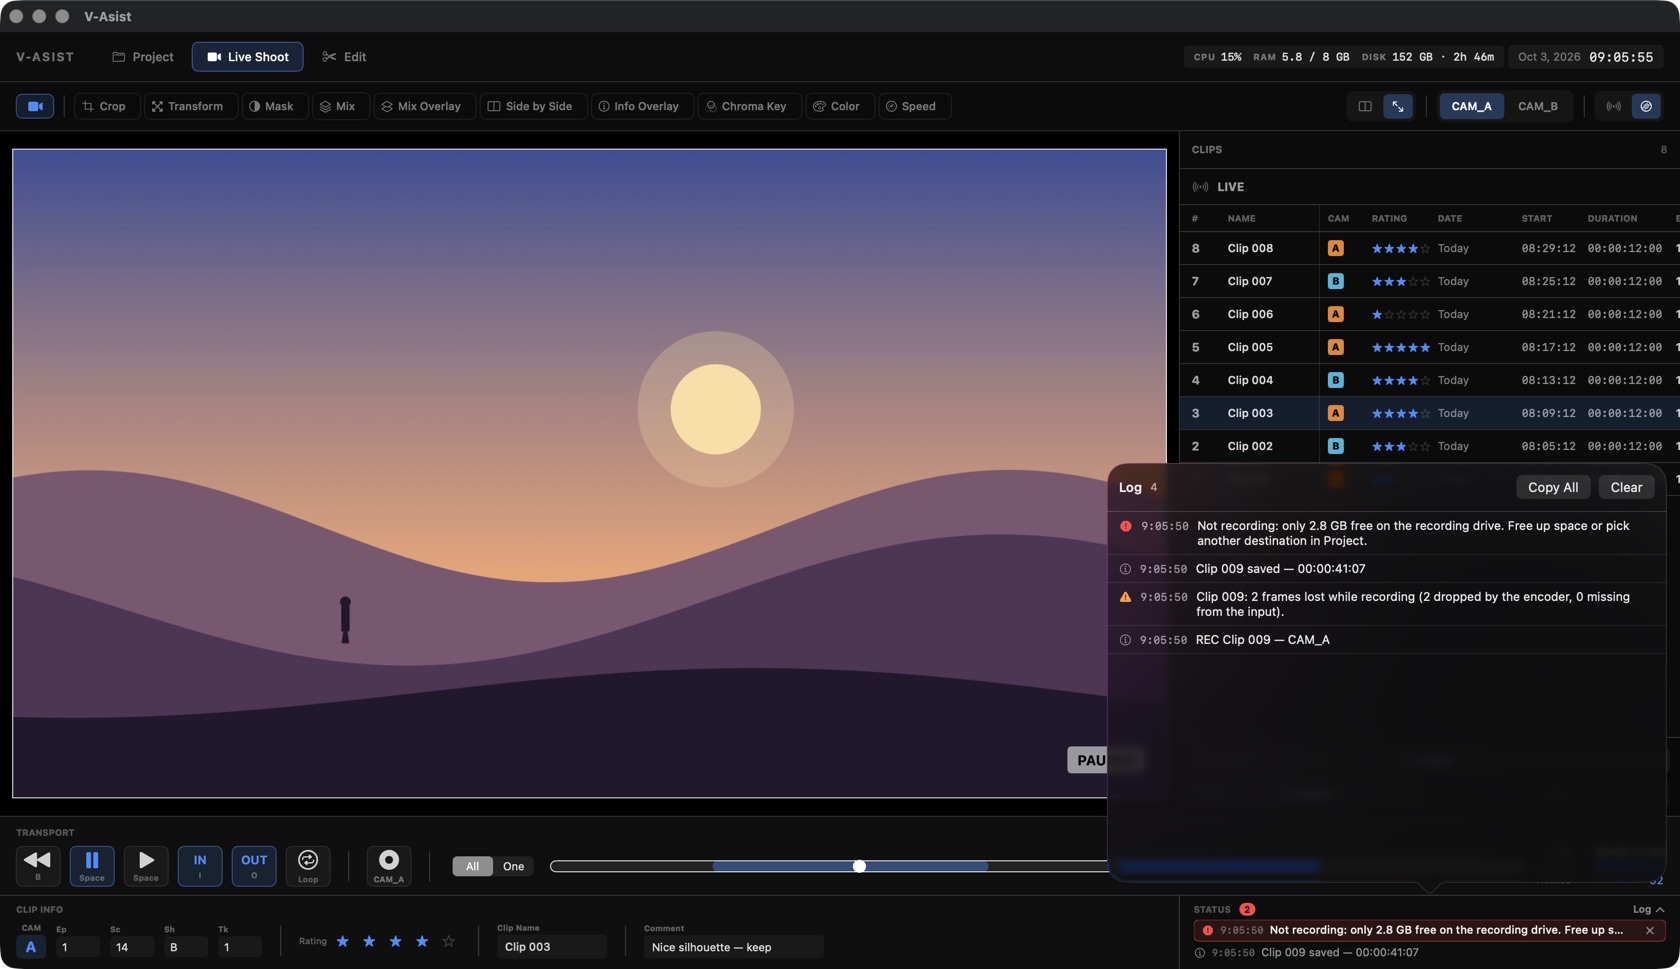
The panel can be switched off in Project ▸ Appearance; then nothing pops up at all, but everything is still logged.
12
SDI output
The VIDEO OUT button (top left) chooses what the village monitors get:
| Mode | Signal |
|---|---|
| Processed | Exactly what the V-Asist view shows: tools, Transform, Mix, frame lines, overlays, disk playback. About 4–8 ms per frame. |
| Live Passthrough | The camera routed straight from SDI in to SDI out in hardware, with near-zero delay. |
The output device and format are set in Project ▸ Camera: Match Input, or a fixed 720p–1080p format (the picture is scaled to fit).
13
Network stream and V-Asist Monitor
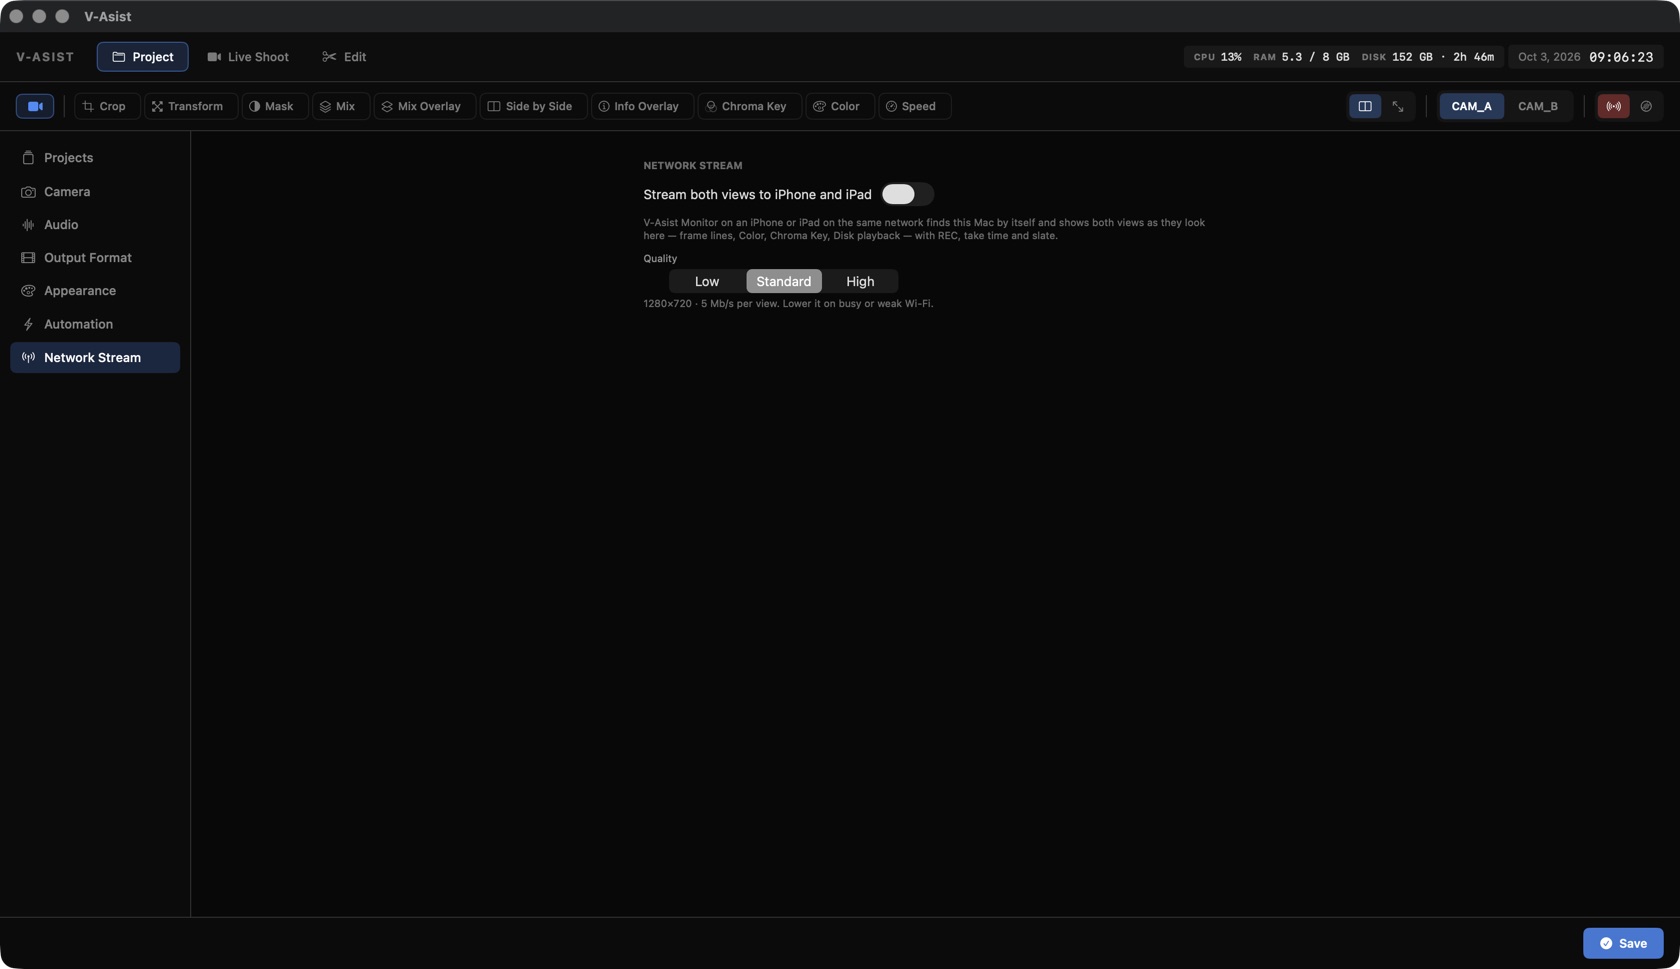
Project ▸ Network Stream ▸ Stream both views to iPhone and iPad sends both views, exactly as they look on the cart, to the V-Asist Monitor app on the same Wi-Fi or network. It finds the Mac by itself; no addresses to type.
| Setting / gesture | What it does |
|---|---|
| Quality | Low, Standard or High: picture size and bit rate, for weak or strong Wi-Fi. |
| Viewers | Every connected iPhone / iPad, by name. |
| Double tap (Monitor) | Enlarge one view, double tap again to go back to both. |
| Two-finger tap (Monitor) | On an enlarged view: saves its current frame to Photos. |
The Monitor shows REC, the take time and the slate. A viewer on weak Wi-Fi skips frames rather than falling behind.
14
Edit room
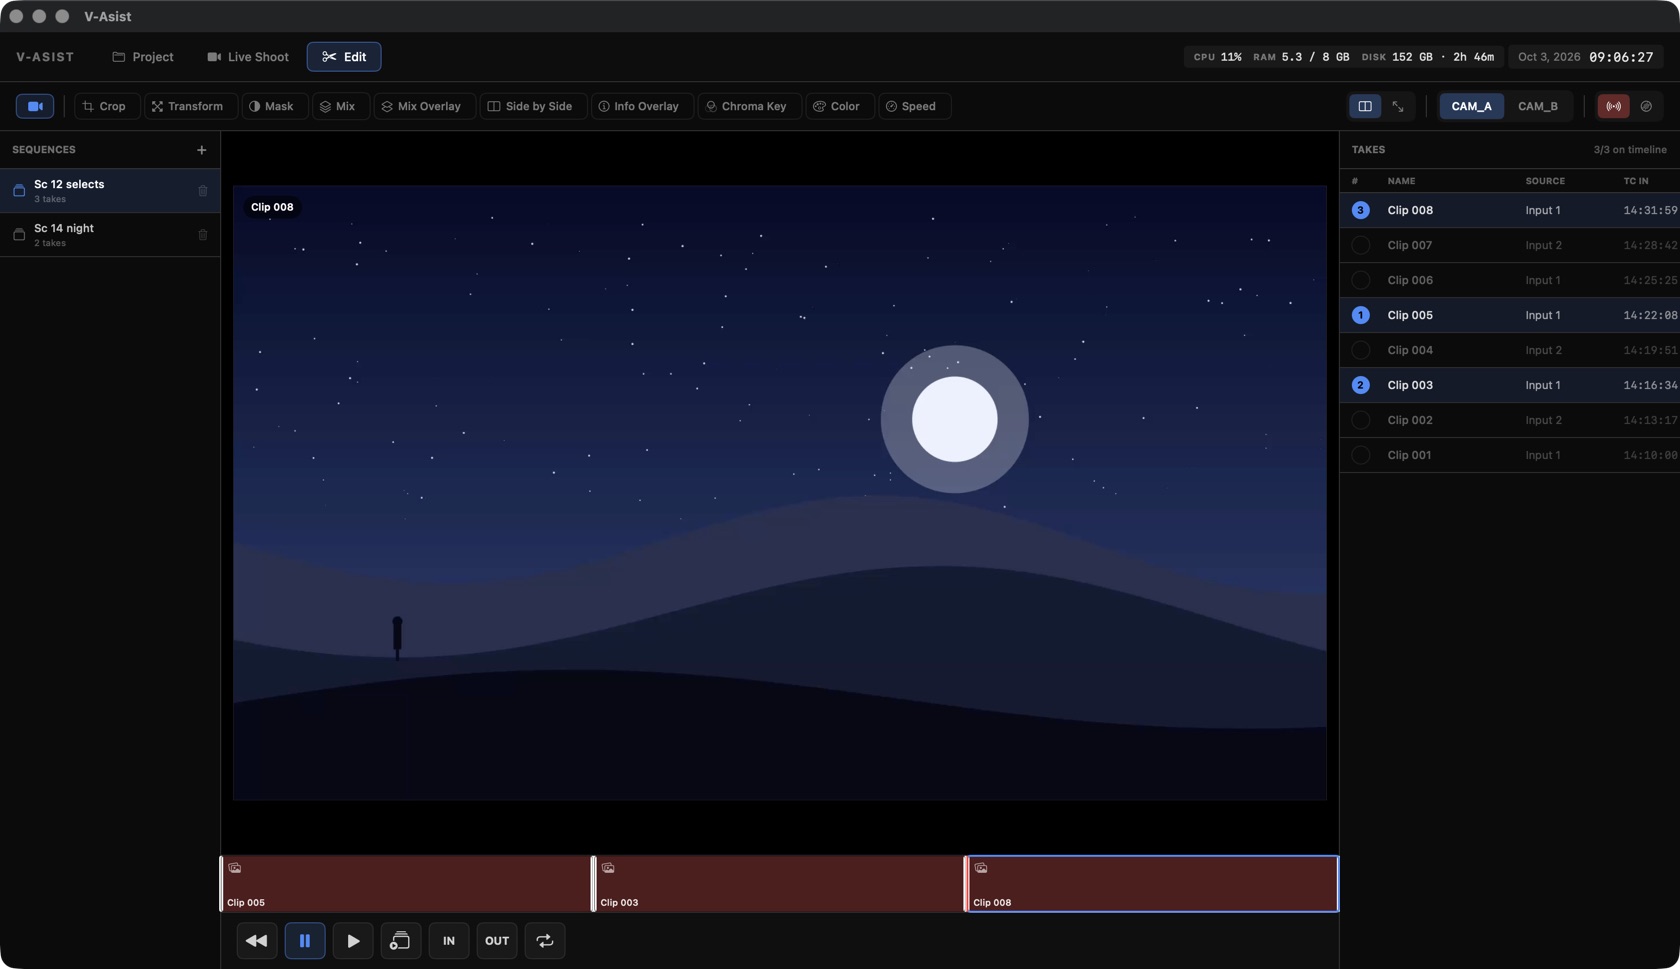
Review selects between setups without leaving V-Asist.
| Control | What it does |
|---|---|
| Sequences · + | Named groups of takes; + makes a new one, the bin deletes it (the takes stay). |
| Takes | Click a take to put it on the current sequence's timeline (up to three); click again to take it off. |
| Filmstrip | One block per take; drag the playhead across the whole strip. |
| ⏪ ⏸ ▶ | Reverse, pause, play the focused take. |
| Play All | Take 1 IN→OUT, then take 2, then take 3. |
| IN · OUT | Trim the focused take; hold 1 s to clear. |
| Loop | Off, one take, or the whole sequence. |
15
Projects and export
Each project is a folder, <destination>/<project>/, with Videos, Screenshots, Extra and its database project.vaproj.json. The last session reopens on launch.
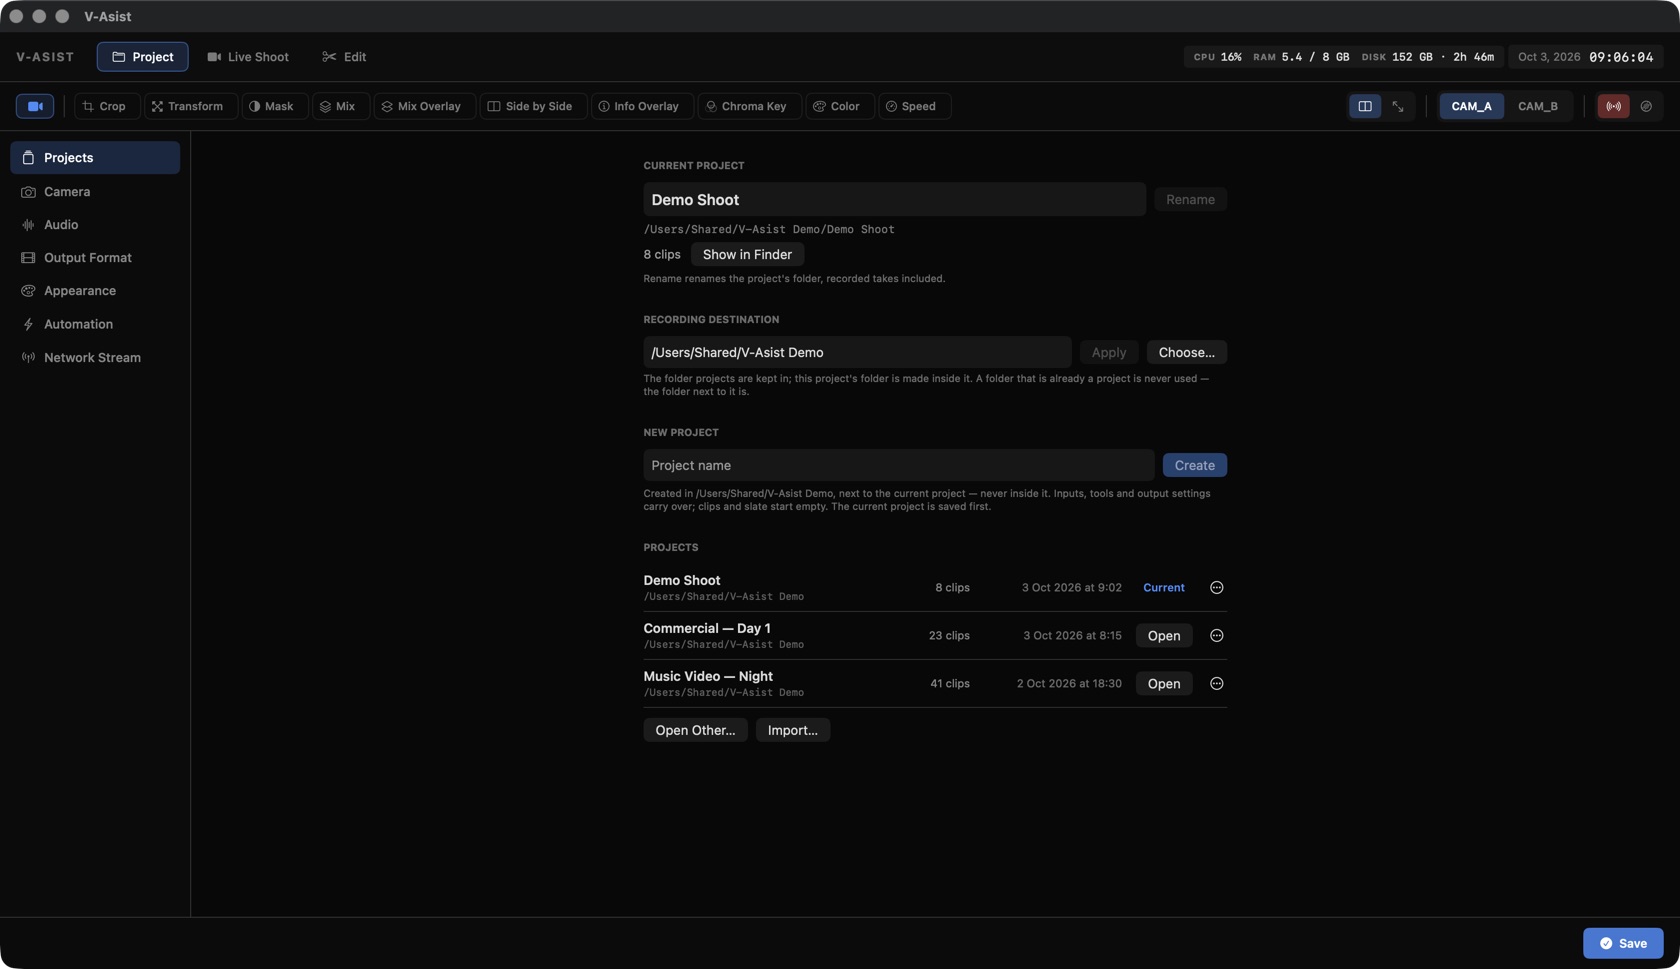
| Control | What it does |
|---|---|
| Project name · Rename | Renames the project's folder, recorded takes included; every path follows. |
| Show in Finder | Opens the project folder. |
| Recording Destination | The folder projects are kept in (Apply, or Choose…). A folder that is already a project is never used: V-Asist uses the folder next to it and says so. |
| New Project · Create | A new, empty project next to the current one. Inputs, tools and output settings carry over; the current project is saved first. |
| Open | Switches to that project. Live capture keeps running. |
| ⋯ ▸ Rename… | Renames any project in the list. |
| ⋯ ▸ Duplicate… | Copies the whole project (shows the size first). |
| ⋯ ▸ Export… | One .zip, with the recorded takes or the project only (clip list, marks, screenshots, overlays). |
| ⋯ ▸ Delete… | Asks first, then moves the folder to the Trash, where it can still be put back. The open project can't be deleted. |
| Open Other… · Import… | Open a project folder from anywhere; or copy in a .zip from Export (or a project folder) next to the current one. |
Project changes are blocked while recording.
Export for editorial
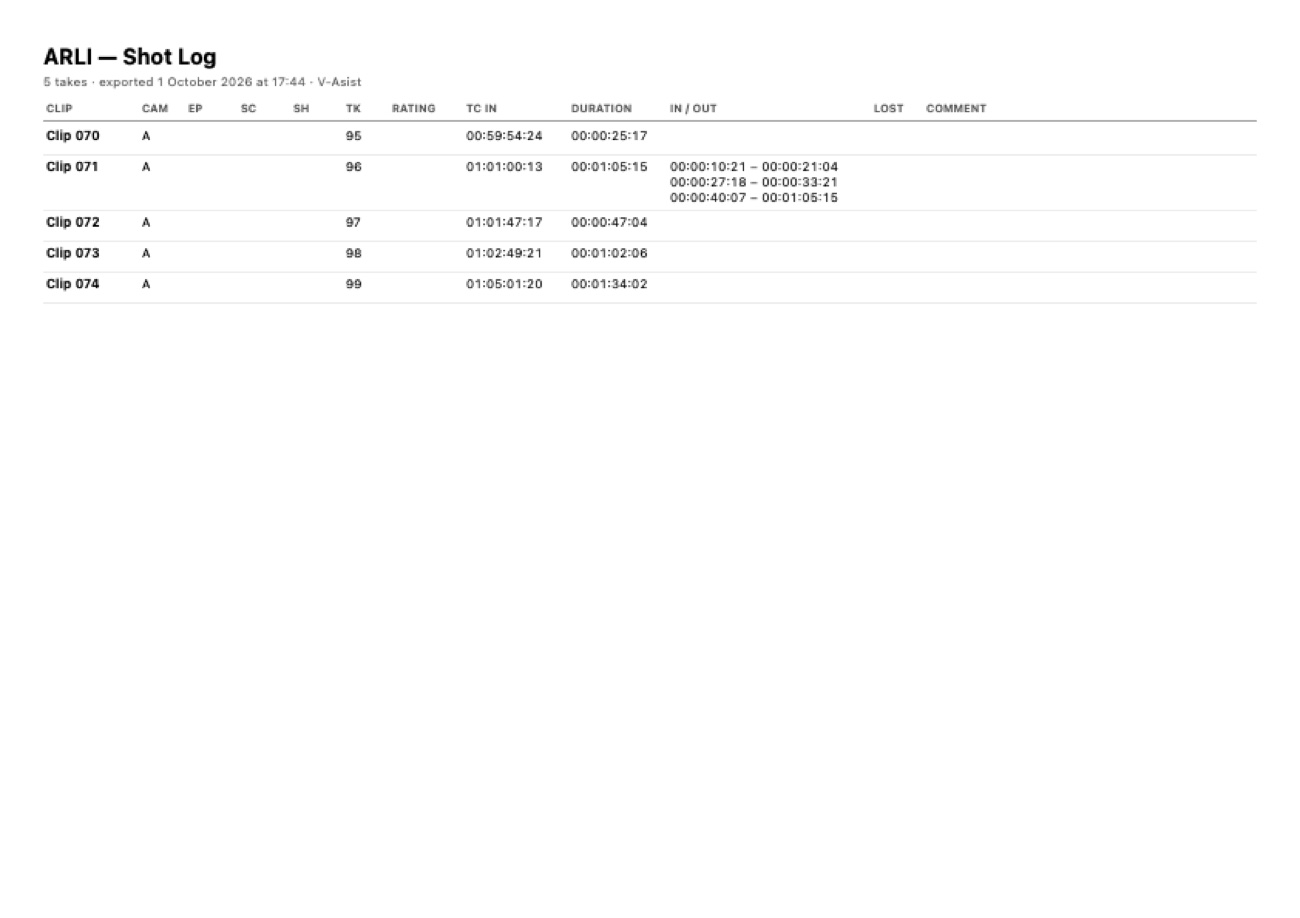
Clip list ▸ Select ▸ Export writes a <Project> Export <date> folder with:
| File | Contents |
|---|---|
| Shot Log .csv / .pdf | Clip, camera, episode / scene / shot / take, rating, comment, TC in, duration, every IN/OUT pair and lost frames. |
| .edl | CMX3600, one event per IN/OUT pair. |
| .xml | Final Cut Pro 7 XML for Premiere, Resolve and Final Cut, linked to the media. |
| Media/ | Optional copies of the takes. |
16
Appearance
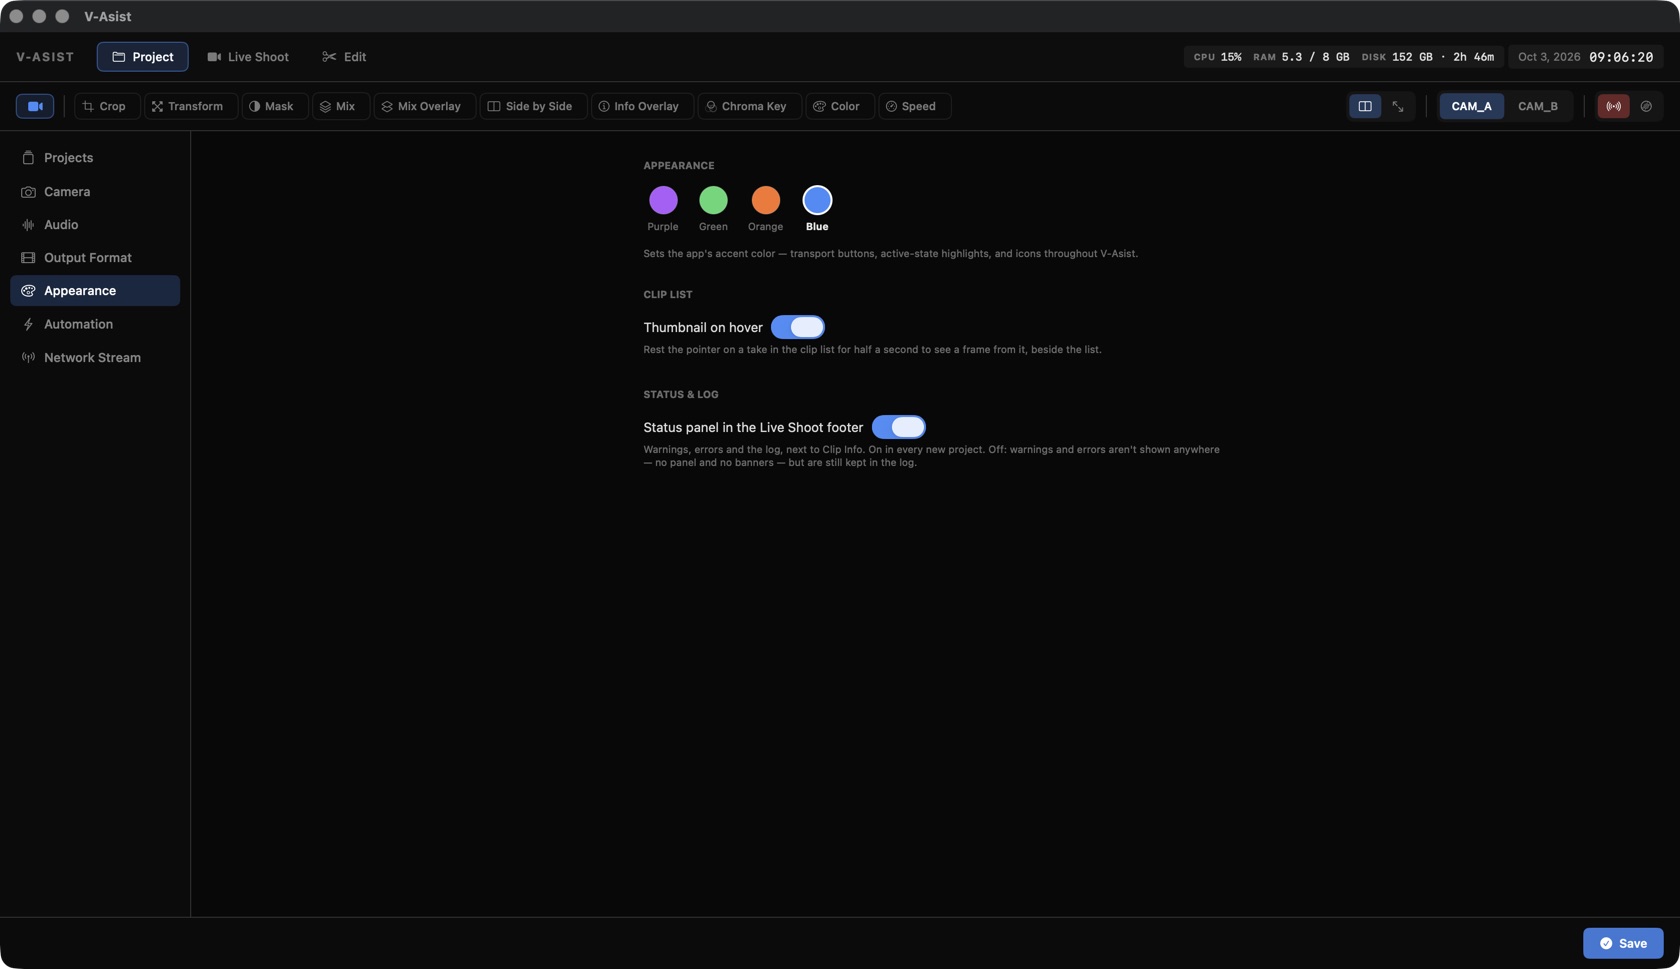
| Setting | What it does |
|---|---|
| Accent color | Purple, green, orange or blue, for buttons, highlights and the timeline. |
| Thumbnail on hover | The clip list's hover preview (on by default). |
| Status panel | The footer's status panel (on by default, and in every new project). Off: no warnings are shown anywhere, but they are still logged. |
17
Safety on set
Tested through a 12-hour shooting day on set.
| Protection | What it does |
|---|---|
| Crash-safe files | Movies are written in 2-second fragments. A crash or power cut mid-take still leaves a playable file up to the last fragment. |
| Takes that fail | If a take can't be written or finished (no picture, the drive gone), a red error says so; a clip never silently appears without media. |
| Dropped frames | Frames the encoder dropped and frames missing from the input are counted live next to REC, logged, stored on the clip and listed in the shot log. |
| Disk guard | REC won't start under 3 GB free; a running take is closed cleanly under 1 GB. |
| AJA conflicts | A warning while AJA ControlPanel, Control Room or System Test is open; they take over the device and freeze the picture. |
| Project safety | Nothing that moves files runs while recording; deleting a project goes to the Trash. |
| Long takes | The record clock never re-renders the interface. A 3-minute ProRes take on an M1 holds 40 % app CPU and about 0.4 ms preview lag from start to end. |
| Typing | Shortcuts are ignored while you type in a text field. |
18
Keyboard shortcuts
Letters and numbers are matched by key position, so they work on any keyboard layout. None of them fire while you type in a text field.
| Key | Action |
|---|---|
| ⇧1 ⇧2 ⇧3 | Project / Live Shoot / Edit |
| ⌃1 … ⌃9 ⌃0 | Open a tool: Crop, Transform, Mask, Mix, Mix Overlay, Side by Side, Info Overlay, Chroma Key, Color, Speed (again: close) |
| Esc | Close the open panel: the rating window, the log, then the tool's row |
| R | Record / stop |
| Space | Play / pause; with nothing loaded, play the last take |
| B | Reverse |
| I O | Mark IN / OUT |
| Delete | Clear IN and OUT |
| ← → | One frame back / forward (hold to repeat) |
| [ ] | Previous / next IN-OUT pair |
| ↑ ↓ | Previous / next take in the clip list |
| ⌥A, then 1–5 | Rate the loaded take (Live: the next take); 0 clears |
| 1 2 | Active view: Input 1 / Input 2 |
| 9 0 | Active view: Live / Disk |
| D | Dual / Full layout |
| F | Picture only (hide header, clip list and footer) |
| ⌘A | Select all takes (in Select mode) |
| H | Minimize |
| Q | Quit (asks first) |
Mouse: hold IN or OUT 1 s to clear that mark; double-click a slider value to reset it; ⇧-click / ⌘-click in the clip list in Select mode.
19
Hardware and requirements
| Family | Support |
|---|---|
| AJA | NTV2 driver: ioXT, Io 4K Plus, Kona, Io, T-Tap, Corvid. Capture, recording, SDI output, REC flag, embedded audio. |
| Blackmagic | Desktop Video (DeckLink API): DeckLink and UltraStudio. Capture, recording, embedded timecode and REC trigger, embedded audio. |
| System cameras | Anything macOS shows as a camera: USB / Thunderbolt capture boxes, webcams. Capture and recording. |
| Audio inputs | Built-in microphone, audio interfaces, Continuity microphone. |
| iPhone / iPad | V-Asist Monitor for the network stream. |
| Requirement | |
|---|---|
| macOS | 26.5 or later |
| Mac | Apple silicon (tested on an M1 MacBook Pro with 8 GB) |
| Drivers | AJA desktop software for AJA cards, Desktop Video for Blackmagic |
Used on set with an AJA Io 4K Plus, AJA ioXT, Blackmagic UltraStudio Recorder 3G, ARRI Alexa XT, and Teradek and Vaxis wireless links.
Good to know
- Quit AJA ControlPanel while V-Asist runs; V-Asist warns you when it's open.
- Quit V-Asist normally (Q or ⌘Q). Force-quitting it while an AJA ioXT is capturing can make the driver lose the card until it's replugged.
- For the Mac microphone or System audio, the input volume in System Settings ▸ Sound must be above zero.
- System cameras record video only; audio comes with AJA and Blackmagic inputs.